Skiff Details
Spring 2015

GET STARTED
FREE PRINT & DIGITAL EDITIONS
A skiff is a shallow, open boat with a sharp bow and square stern. After building some skiffs of various designs and having the opportunity to observe them over time, I have found details that have worked nicely that might be of value to others.
The gunwale of an open craft is a structural element comprised of longitudinal members that give strength and stiffness. There are two components to each side of the boat’s gunwale, inwale and outwale, are separated by the hull’s planking. The outwale is often subjected to impacts and abrasion so is fitted with a rub rail of some protective material. The inwale connects to breasthook and transom knees as well as oarlock blocking.
Most inwales and outwales are produced of rectangular wood. This can be tricky to bend as there is twist involved, the cross-section dimension, and the degree of bend.
I’ve come up with a successful modification to a typical gunwale. It twists and bends easily, and is lightweight, stiff, and durable.
Using half-round stock mahogany, fir, or spruce stock (for small boats simple pine molding available from lumber yards works well), fit the inwales and bond them in place using spring clamps spaced about every foot to secure the inwale until the adhesive cures. Do both port and starboard at the same time to retain hull symmetry. Next, fit and bond the outwales, again securing with spring clamps. It is much easier to install the inwales and outwales separately than to install all four at once.
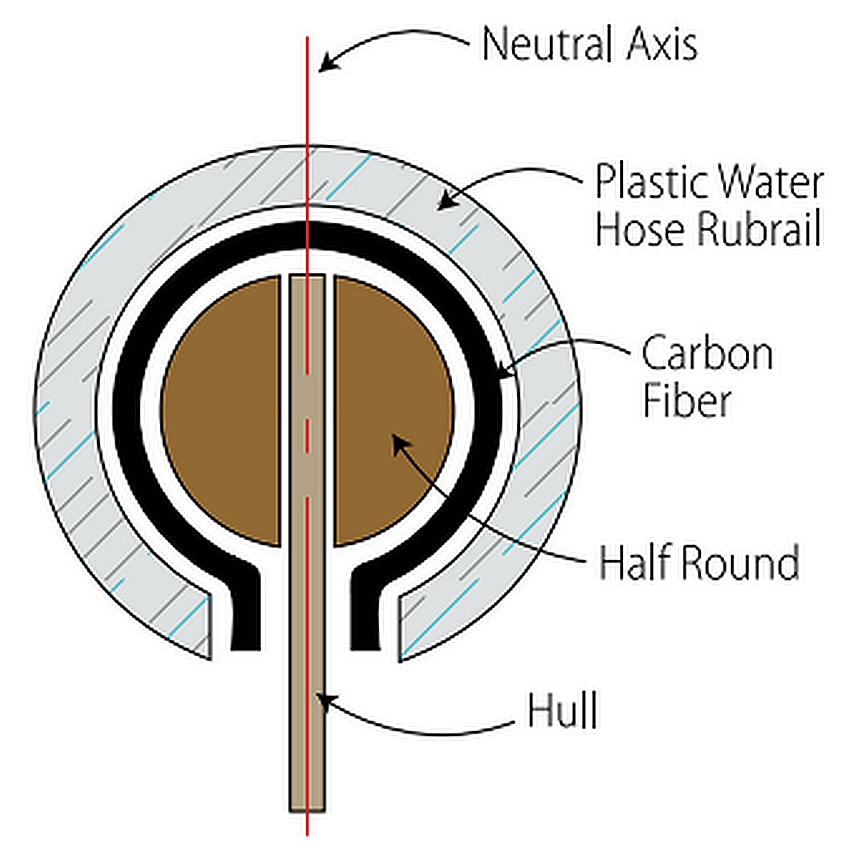
When all the inwales and outwales are installed it is surprising how much these two elements stiffen the structure. For additional stiffening apply one layer of 2″ or 3″ wide unidirectional carbon fiber tape the length of the gunwale. Carbon fiber is a great reinforcing and stiffening material and is best utilized furthest from the neutral axis of the gunwale’s cross-section. (the outermost edges of the gunwale from the hull).
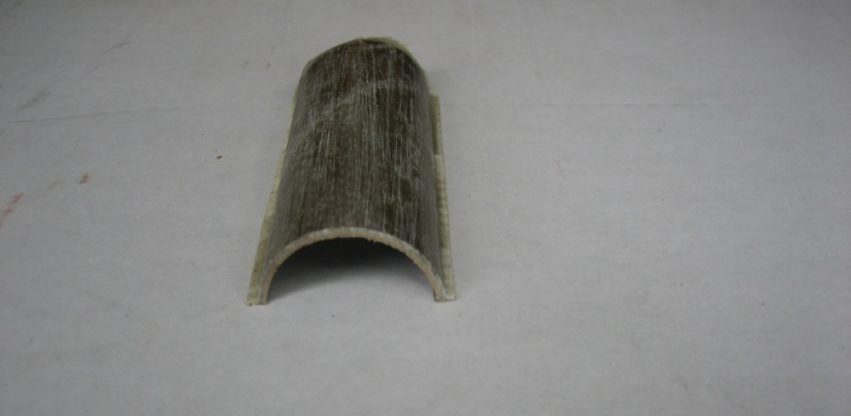
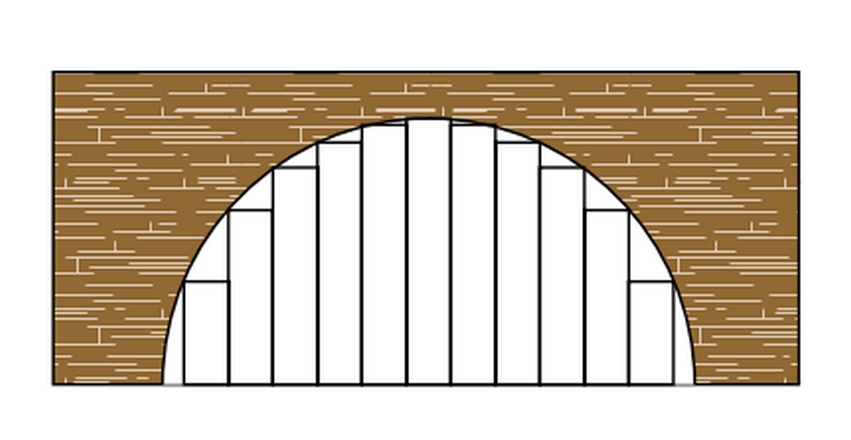
Breast hooks, transom knees, and oarlock blocking must join the gunwale which requires matching the round inwale. An easy way to make a good fitting joint is to machine a half-round groove in your stock using multiple passes on a table saw. Then, using coarse sandpaper wrapped around a dowel, sand any remaining ridges in the groove. From your newly machined stock, cut all the parts needed to fit over the gunwale and bond them into place.
For a rub rail, use a sliced plastic water hose of an appropriate inside diameter to fit snugly over the gunwale.
Slicing the hose safely was given some thought. I fashioned an aid for slicing the hose from an aluminum tube that allows the hose to pass through it with little clearance. The tube has a slot cut in the top of one end to accept the blade of a utility knife.
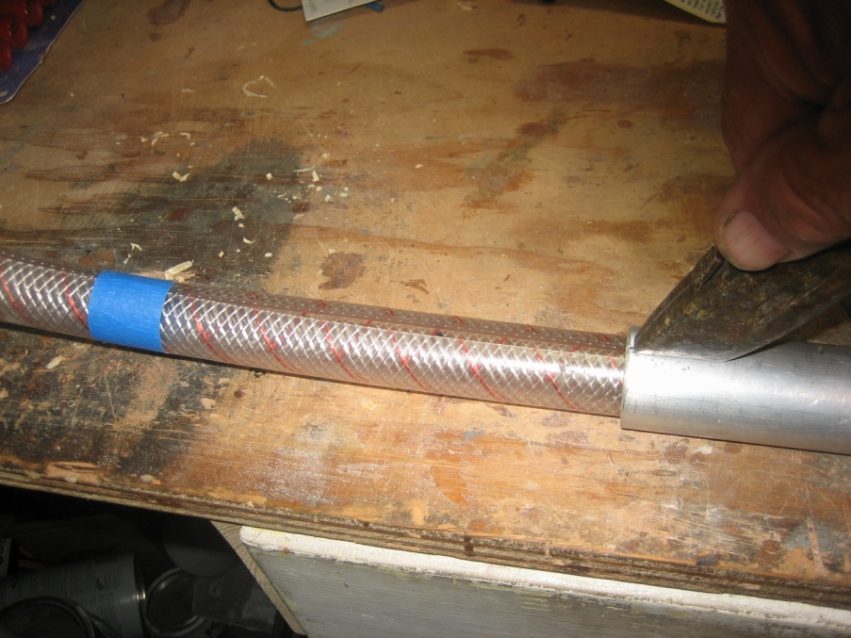
Drill a hole so the tube can be screwed to the shop bench while slicing the hose. Draw the hose through the tube while holding the knife in the slot. Every foot or so, wrap with the sliced hose with tape to prevent twisting so the slice does not spiral around the length of the hose; that would make for a poor installation. Tip: Always measure your hose and add a couple of feet. I bought 22’ of hose and sliced it only to discover the salesman had only given me 20’ – I had 9’ of slit hose I could not use. Better 2′ too long than 2″ too short.
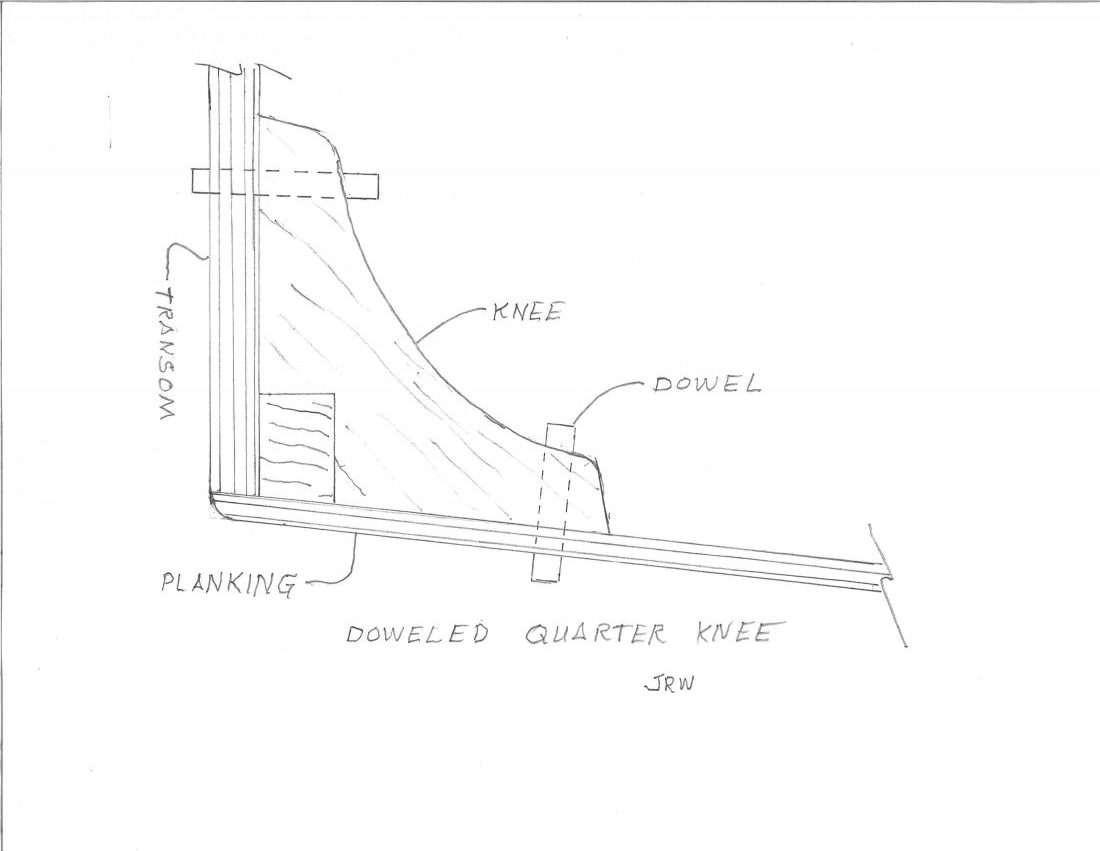
Skiffs lead a rough life. It’s the bump when coming alongside another boat, the bang of a dock, and the thump of a piling strike. The corners (at bow and transom) of an open skiff attract a lot of forces and are typically reinforced with gussets. Specifically, a gusset at the bow is called a breasthook, at the stern transom knees. The intent of the gusset is to accept tension and compression forces plus increase attachment area. One of the most challenging forces corners are exposed to however is the silent, unnoticed but ever-constant creep that if not correctly reinforced, with sufficient time, will result in failure. The force exists as wood’s memory is to be straight, so it resists the curved shape it is bent to create the boat shape. The resulting cleavage force is due to joint geometry and the direction of the loading.
Concentrations of normal tensile stress through the adhesive layer at the edge of the joint make it susceptible to failure. To prevent this type of failure, bond a wooden dowel through all the elements of the joint.
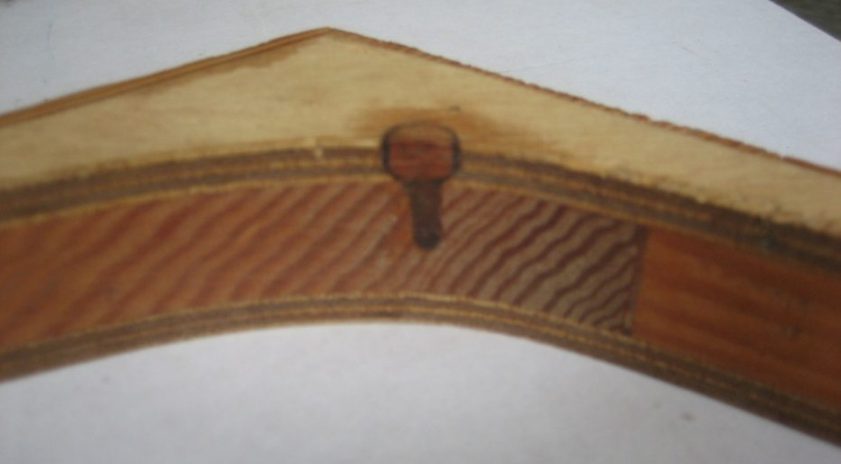
Certainly, you begin assembly with an adhesive that has good creep performance (there is quantitative data available to evaluate this quality). After all the joints of a corner, including the gusset are completed and the adhesive cured, drill a ¼” – 5/16” diameter hole directly through all the elements as close to the end of the gusset as practical. Then swipe the hole with wet epoxy. While soaking, precut dowels (cut ½-inch long with square cuts so the dowel does not split when tapping) and place them in the mixing pot (until they swell slightly). Allow the epoxy to soak into all the end grain that the drilled hole exposes then push or tap the dowel into place and allow to cure. Cut flush the next day. Note: if the dowel does not pass through, but is blind, you must not be too aggressive driving the dowel home or hydraulic force may split the wood.
If you cannot use C-clamps, spring clamps, or weights, use drywall screws as temporary fasteners. They work well to draw parts together, exert pressure and hold components in place until the epoxy cures. Once the adhesive has cured, withdraw the fastener. What’s left is a fastener hole and often, a depression from the fastener’s head. Filling with thickened epoxy is tedious; often requiring several attempts to get flush. The difference in material density between epoxy and wood will result in “print thru” over time. A wooden bung resolves this issue.
For boats, I prefer this method over a permanent screw as moisture will condense on the screw and enter the end grain exposed by the fastener hole.
This approach is quicker, more effective, economical, and looks better over time than filling with epoxy. Countersink the remaining fastener hole with a #10 Fuller countersink, then bung with a wooden plug of the “approximate” species of wood (e.g. Mahogany plywood, use mahogany plug). Produce these bungs on a drill press from scrap wood using the matching plug cutter. Use non-laminated lumber for plug material, not plywood. This works for painted and natural finished surfaces.
Drill/countersink the hole using a common drill that fits the countersink and is set it to drill about ½” deep, drip clear epoxy into the hole, and dab a little on the bung. I try to align the wood grain of the plug with the substrate. Push in place; sometimes a light tape of a mallet is required. Allow to cure, and then cut flush with a flush-cut saw. A light swipe with sandpaper and the surface is ready for coating. If you don’t have a flush-cut saw use a chisel but cut (don’t split) the bungs because if the grain dives you’ll have a divot to fix. Use a sharp chisel. Make a light cut high on the bung to determine which direction the grain is going, then cut more, finally cut flush with the chisel.
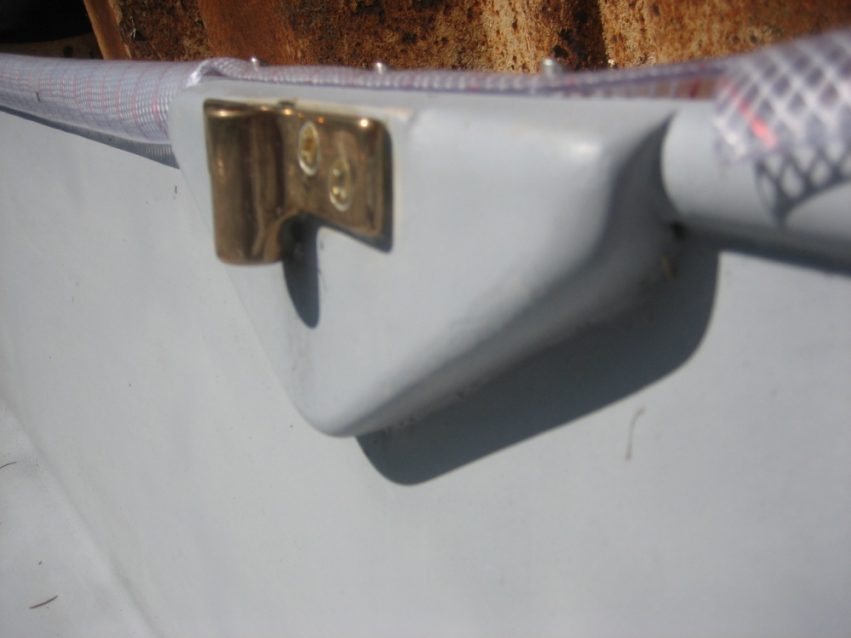
The self-bailer (invented by Danish Paul Elvstrom and branded and built by Andersen) is a device that, when opened, draws water from a craft when there is sufficient forward motion (usually about 4 mph). A flap prevents water from flowing into the boat when speed is insufficient. When the self-bailer is closed it is flush with the bottom.
I cannot row 4 mph, but the bailer works if motoring or sailing as the bailer was intended. It also works well if the dinghy is towed behind its mother ship. However, I like the bailer for another reason; it serves excellently as a drain. It is located at the lowest point of the hull so when setting on bunks out of the water, or in hanging from davits, rainwater can drain.
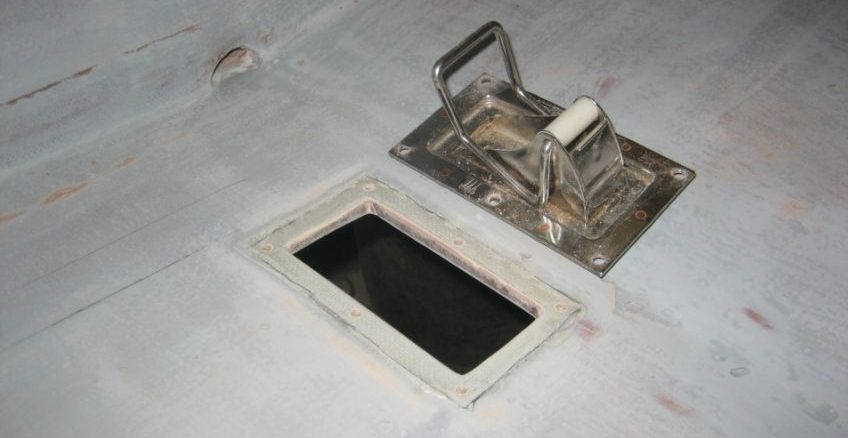
To install a bailer, make a template to mark where the cut-out should be placed. Cover the plywood in that area with a layer of 6-ounce fiberglass fabric trimmed to the outer edges of the bailer. The fiberglass reinforces the plywood planking for the bolts used to mount the bailer. After drilling, bed the bailer in G-flex 655 Epoxy and bolt it all together. Be careful to clean all surfaces of excess epoxy prior to curing; scrape first then wipe with alcohol.
The seats of my skiffs are intended to be watertight and provide buoyancy in the event of a capsize or swamping. The problem is that the middle seat separates the forward half of the boat from the aft half preventing rainwater or splashed sea from draining to the lowest point for removal. To solve this problem, I limbered the middle seat so water can pass through, yet the watertight integrity is retained.
To create a limber hole, slice a cardboard tube, like that used for paper towels, length-wise. Place this ½ tube onto a bench covered with plastic. Wet out and apply 3 or 4 layers of 6 oz. fiberglass cloth over the cardboard tube, allowing extra along the edges to create a flange and allow to cure. On the seat bulkheads where you want the limber hole to be, cut a half-round hole matching the inside dimensions of the 1/2 tube you’ve created. Trim the tube to length and place it between the bulkheads. Now, bond the flange in place filling voids and adding glass tape at the joint of the tube to the bulkhead. When the epoxy has cured, the compartment will be watertight with a limber hole passing through it.