

By Tom Pawlak — GBI Technical Advisor
In 1991, during testimony before the United States Senate Special Committee on Aging, Grateful Dead drummer Mickey Hart stated:
”Typically, people gather to drum in drum ‘circles’ with others from the surrounding community. The drum circle offers equality because there is no head or tail. It includes people of all ages. The main objective is to share rhythm and get in tune with each other and themselves. To form a group consciousness. To entrain and resonate. By entrainment, I mean that a new voice, a collective voice, emerges from the group as they drum together.”
I recently joined a group of mostly old guys who meet a couple of weekends a year to experience nature and the great outdoors. We all come from a diverse cut in society yet we all get along so well. One reason is we all love nature but another reason, I believe, is when we first gather and just before we leave a couple of days later, we sit in a circle and we drum together for 10-15 minutes. It is a simple but effective primal group ritual that allows us to release hard-wired anxieties and help clear our minds. I can’t explain why it works—it just does. Apparently, others feel the same way because drumming circles are gaining popularity in many communities around the world.
New members, participating for the first time, often arrive without drums because they don’t own drums or because they haven’t found anyone willing to loan them one. More likely they are like me and don’t want to ask friends for a drum because they would have to admit what they need it for.
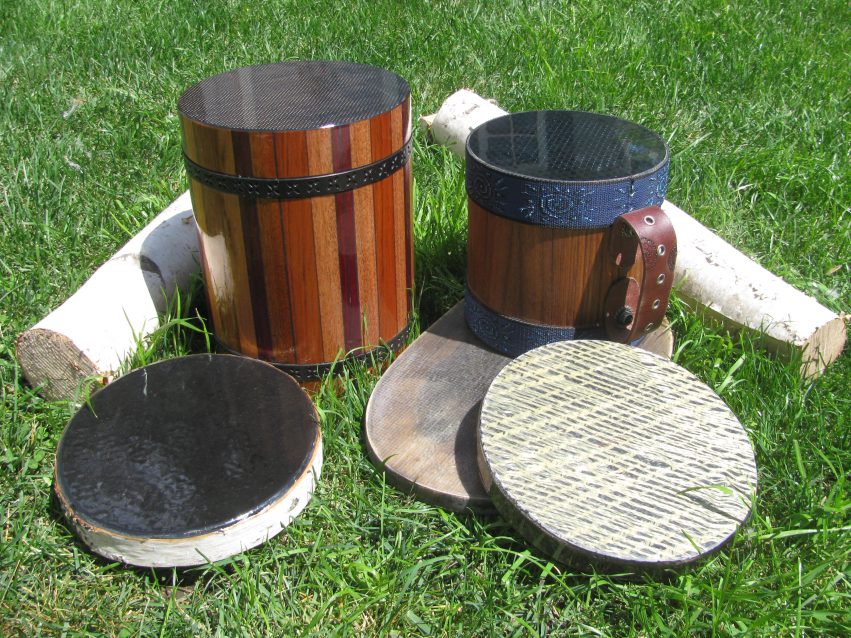
Many of the guys I drum with have their own drums. Some built theirs at home from kits purchased online while others attended weekend workshops to build their drums from scratch with expert guidance. Some of the guys also purchased drums made by someone else. The drum shells are mostly made from wood but some are made of metal and a few are fired ceramic. Nearly all of them are covered with animal skins that have been stretched by lashing cords and other means. Each drum is a statement in itself about the person who built it.
I’m a composites guy who loves to build things. I thought if I made my own drum it could be unique. Over a period of months, I kept thinking about what a drum would sound like if it were made with a carbon fiber skin, a Kevlar® composite skin, or even a fiberglass composite skin.
One of the benefits of working on Gougeon Brothers’ tech staff is we have a number of old cored composite panels leftover from panel stiffness testing. Some of the 2’x2’x1” panels are undamaged and have been on the shelf for 15-20 years. I began experimenting with how different composite skins sound by cutting away the middle of the composite skin on the backside of the panel and removing the core in the center of the panel. That way the smooth molded side skin was left unsupported by core in the middle of the panel. This allowed me to hear what the skin sounded like when struck by my hand. I discovered if the composite skin was more than .040 to .050” thick it did not sound anything like a normal drum. It did not resonate well—at least not for my taste. But I discovered if the composite skin was thinner, it actually sounded great and looked pretty interesting at the same time. The success achieved from these experiments gave me the confidence to build the strip planked composite drum that is featured in this article.
If you are intrigued by the idea of building your own composite drum, here’s one way of building a unique and unconventional drum:
Locate a smooth shiny solid surface like plate glass or shiny Formica® laminate to act as a mold that is slightly larger than the top of the drum shell that you have in mind.
Apply several coats of mold release wax to the mold (PARTALL Paste #2 works well for this) so the composite drum skin can be removed after cure.
Apply a thick coat of WEST SYSTEM 105 Resin/207 Special Clear Epoxy and lay a light layer of 2 to 4-oz. fiberglass cloth into it. Allow the epoxy to soak into the fiberglass for a minute or so then wet out any remaining dry fiberglass areas with more epoxy.
Lay a piece of dry carbon fiber, Kevlar®, woven or biaxial fiberglass fabric into the epoxy while allowing the epoxy to soak through the fabric. Apply more 105/207 as needed to finish wetting out the fabric. Apply another layer of the same 2-4-oz fiberglass as used initially over the carbon fiber, draw off excess epoxy with a plastic spreader or squeegee then cover it with release fabric to compress the fibers. If you don’t have release fabric, just allow the epoxy to cure.
Allow it to cure and leave composite skin attached to glass mold until after you are able to glue the drum shell to the composite skin.
Building the Drum Shell
Locate a mold or former for the drum.
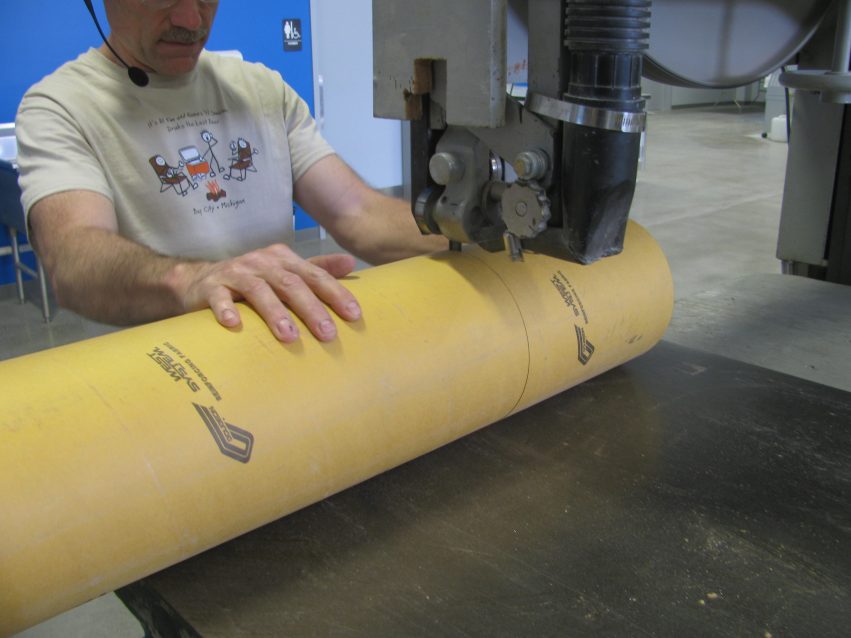
An 8” diameter cardboard shipping tube caught my eye as a simple form onto which I could glue wood strip planks. I could cover it with shiny Cellophane tape and edge glue the wood strips together, pull it off and apply fiberglass inside and out or I could take the easy way out and glue the wood strips to the rigid cardboard tube so fiberglass would not be needed at all. I took the easy way out given that keeping the drum shell light was not important.
Fabricate wood strips
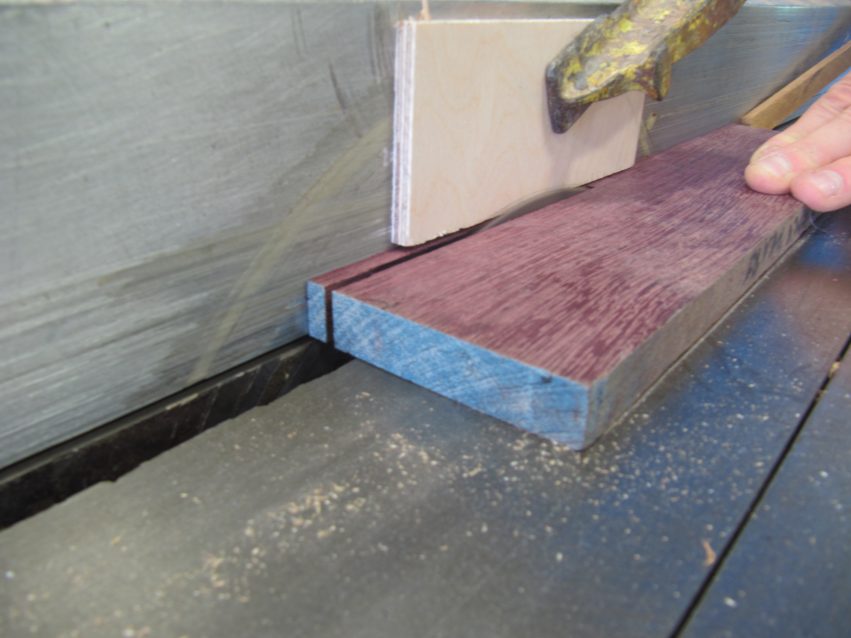
I found a nice variety of ½”, ¾”, and 1” thick wood scraps with varying colors that I took to the table saw and ripped into ¼” thick strips.
An 8” diameter tube has a circumference of about 25” so I would need enough wood strips to cover the shipping tube.
Create accent strips
I decided to rip the darkest wood strips down to ¼”x1/4” for use as accent strips.
Once my strips were ripped, I tried several different patterns for orienting the strips. The Jatoba wood strips were a bit wider and a bit more colorful than the other woods so I used them in the center of my repeating pattern.
Dry fit the pieces
I stood the cardboard tube on end and verified that the tube was cut square with a framing square. I sanded the end slightly a couple of times to make it perfectly square.
I marked the circumference of the tube into eight equally spaced segments. From each segment mark, I used a combination square to draw the equal spaced lines that were perpendicular to the length of the tube.
These lines were used to locate the first accent wood strips that were glued on with G-5 Five-minute Epoxy.
I used few heavy rubber bands around the tube to hold my wood strips in place while the epoxy cured.
The rest of the wood strips were dry fitted in between the glued in divider strips. I adjusted the width of the strips slightly with a sanding block and a low-angle block plane so they all fit nicely against the tube with rubber band pressure. The strips were numbered so they could be removed and glued into place later. Working with the separate segments would allow me to turn this into eight separate gluing sessions if needed, which took some of the stress out of attempting to glue them all at once.
Unthickened 105 Resin/206 Slow Hardener was initially applied to the cardboard tube and to the wood strips with a disposable glue brush.

Epoxy thickened with 406 Colloidal Silica and colored with 502 Black Pigment was applied to the cardboard tube with a finely notched trowel just prior to pressing the wood strips in place. The glue squeeze-out was more than enough to fill the slight gap between strips.
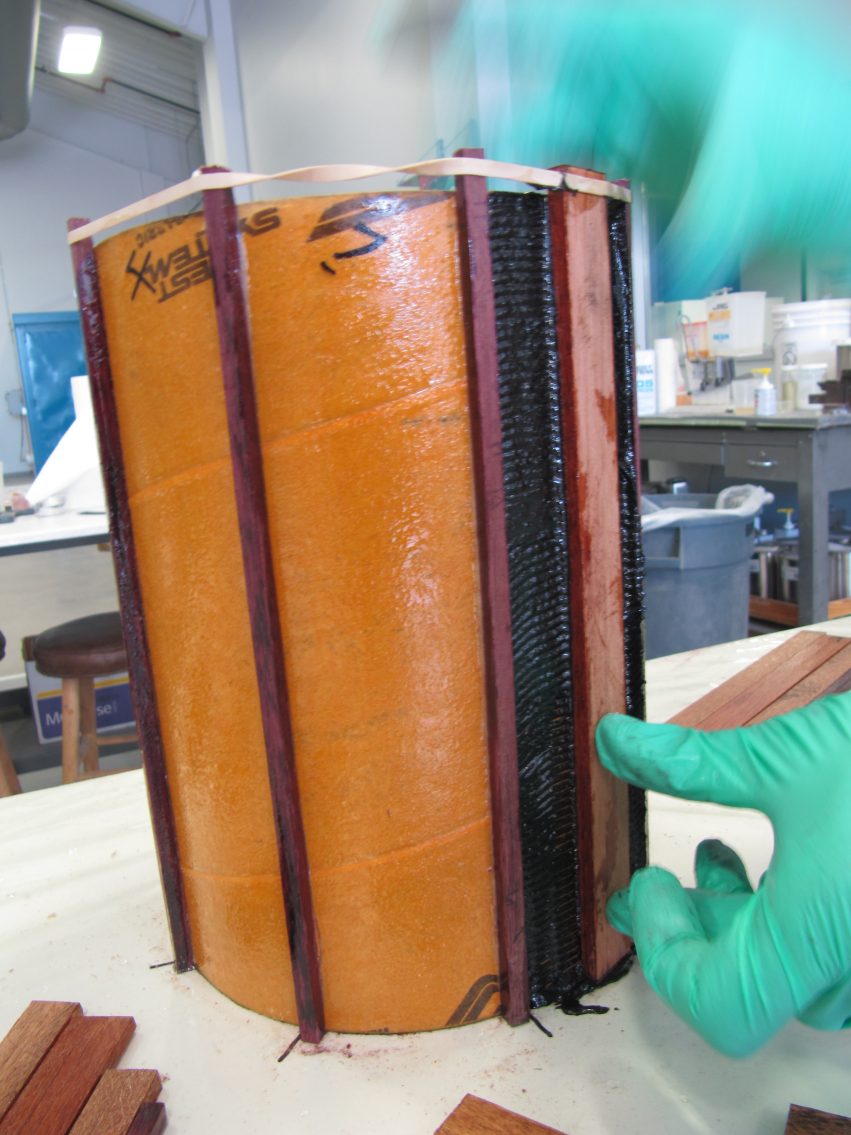
It took about 35 minutes to apply the epoxy and press all of the strips in place. Initially, I just worked with one rubber band to hold the strips in place then, after the last strips were applied, I added more rubber bands.
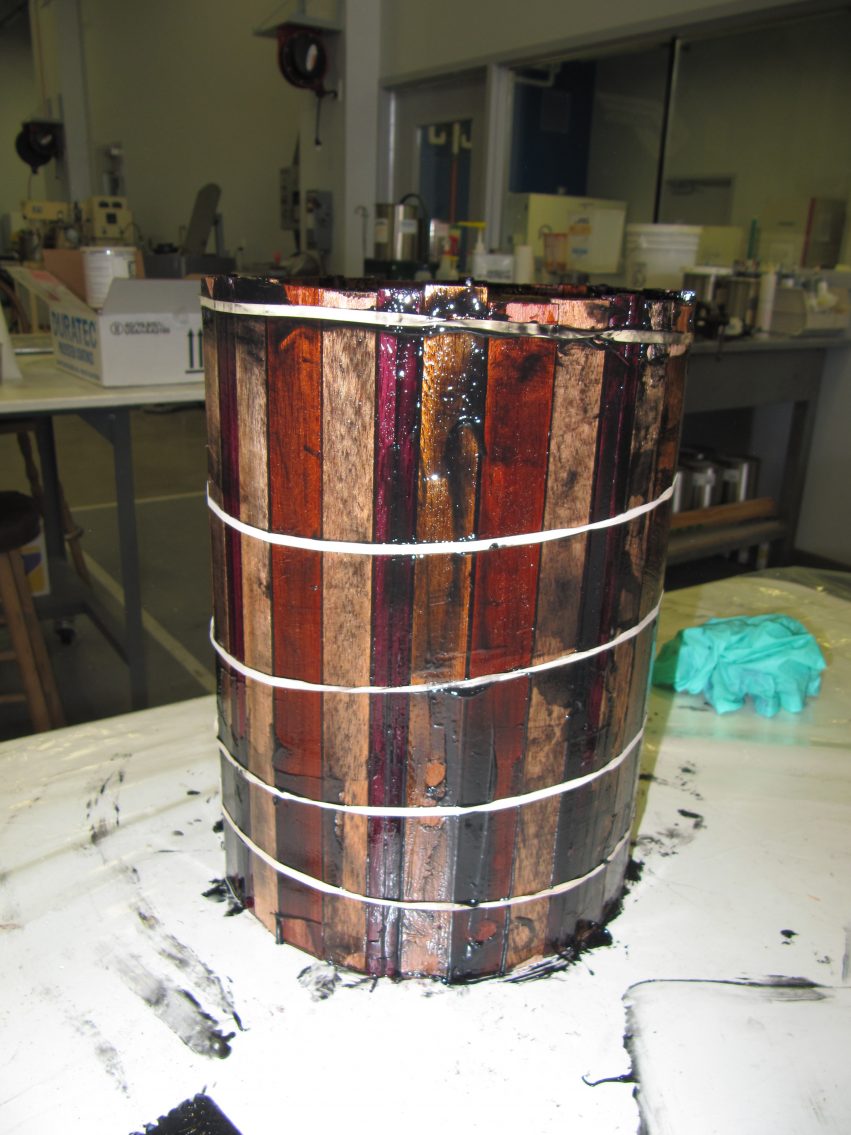
I allowed the epoxy to cure for about four hours so it was cured enough to remove the rubber bands and yet soft enough to remove the excess epoxy with chisels and scrapers. This step saved considerable time that otherwise would have been needed to sand the epoxy away.
One of the challenges in making round tubes with strip planking is it takes some skill to turn the flat wood strips into fluid curves. When different wood species are used, the challenge increases because of differing densities and hardnesses. In other words, the softer woods sand more easily than the hardwood strips, making it difficult to make the tube round.
Creating a curved sanding block
I decided that having a specialty sanding block would be worth the time spent making it. I’ve used G-5 Five Minute Adhesive to make curved sanding blocks before so I just needed to find a cylindrical object with the correct diameter.
I got lucky and found a roll of fiberglass fabric in the shop that matched the diameter of the wood drum shell. I covered it with plastic stretch wrap to protect the roll of fiberglass and to act as a mold release for the epoxy. I brushed a coat of G-5 onto the stretch wrap then quickly applied a layer of paper
towel into in. I applied another coat of G-5 and laid another piece of paper towel into it. I repeated this process four times before allowing the G/5 to cure.
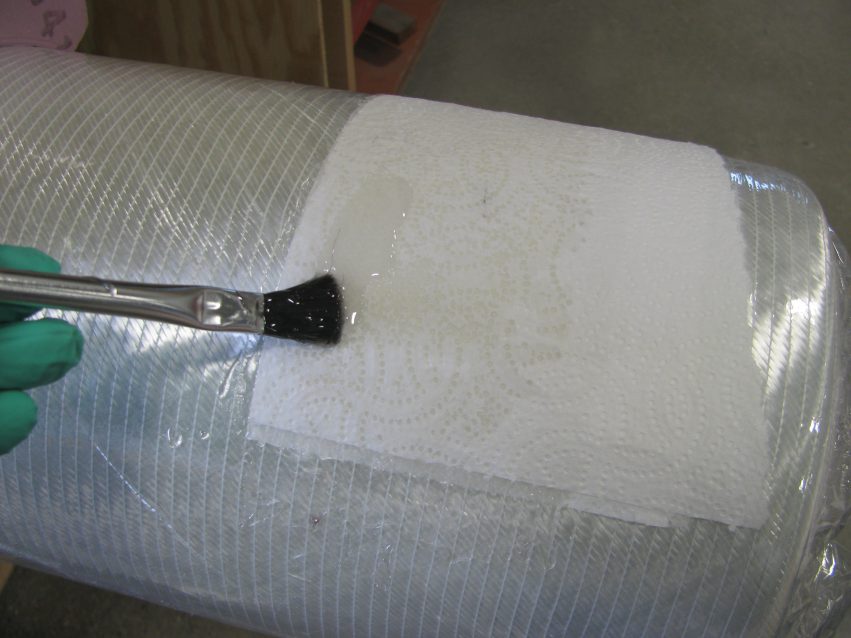
I found some pink foam insulation board that I cut to match the curve and glued it to the G-5/paper towel laminate with G-5 thickened with 403 Microfiber. Fifteen minutes later I had my sanding block.

When making curved sanding blocks for use on the outside of a cylinder, be sure to get the curve right or make it slightly oversized (to account for sandpaper thickness). If the sanding block is made on too tight a curve, only the ends of the sanding block will touch which makes it rather useless.
Adhesive-backed sandpaper works especially well when using simple curved sanding blocks.
Eventually, I took the drum shell home and mounted it in my lathe to cut the grooves for the decorative banding. This step could have been done on the table saw or on a router table as well with a little setup and fixturing.
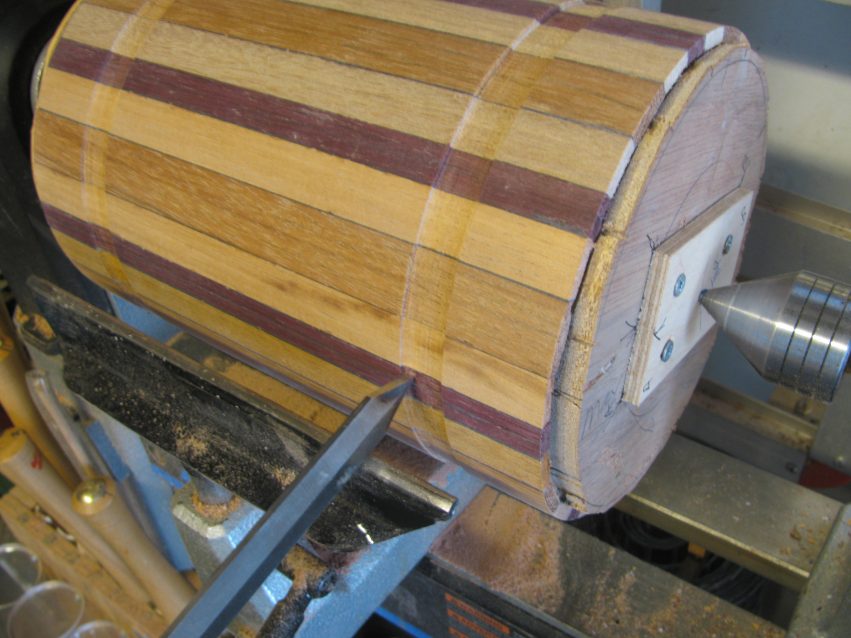
I modified a cabinet scraper on a bench grinder to match the 8-1/2” diameter drum shell curve for truing up some of the stubborn high spots. Scrapers are amazing for this type of cleanup—if they are sharp. For more information on scrapers, see Scrapers—Versatile Tools for Working with Epoxy in Epoxyworks #19.
Once the wood was sanded smooth and round, I applied a single coat of 105 Resin cured with 207 Special Clear Hardener. I allowed this to cure 24 hours then I sanded it smooth and dull and applied one additional coat of epoxy. Alternatively, the wooden drum shell could have been finished with a few coats of clear polyurethane or varnish. The inside of the drum was sealed in black pigmented 105/207 epoxy that was created by adding 502 Black Pigment. I could have used 423 Graphite Powder instead to create the black epoxy coating as well.

Gluing the composite skin to the drum shell
Protect the outside of the drum shell with masking tape on the end that will be glued to the composite skin.
Be sure to pull the release fabric covering the composite skin that is still attached to your flat shiny mold. Sand it lightly in preparation for gluing. If you did not cover the composite skin with release fabric, be sure to sand gluing areas with 80- or 100-grit sandpaper.
Apply unthickened epoxy to the top lip of the drum shell and to the gluing surface on the composite drum skin.
Apply a bead of epoxy thickened with 406 Colloidal Silica (to a mayonnaise consistency) or other high-density filler to the top of the drum shell and set it onto the composite skin. This step could instead be accomplished by using Six10 Thickened Epoxy Adhesive (the clear epoxy wet out step is not needed with Six10). If you like, you can color the epoxy with dry powder pigments or better still use 501, 502 or 503 White, Black or Gray Pigment. Form a small fillet from the excess epoxy that squeezes from the joint on the inside of the drum shell. Wipe off excess epoxy on the outside of the joint.
Put a weight on the bottom of the drum shell (the end that is up for this operation) so it will remain undisturbed while the epoxy cures.
Pull the protective tape from the outside of the drum shell before the epoxy cures.
Allow epoxy adhesive to cure overnight.
Work a wood wedge under the composite skin to free it from the flat mold.
Use a saber saw, band saw or metal cutting hack saw to carefully remove the excess composite skin that projects beyond the sides of the drum shell.
Trim rough edges away with sandpaper wrapped around a hardwood block. Break the corner with a small 45° bevel.
Wipe a thin coat of unthickened epoxy over the sanded edge to bring out the shine and allow it to cure.
To finish out the drum shell, I considered several different accent banding materials. I found a couple of old leather belts that I cut into ½” wide strips. I found some salvaged stainless steel cable that I wrapped multiple times around the drum to fill the groove that I also liked. Unfortunately, that presented some aesthetic challenges where the cables started and ended. I finally filled the accent grooves with the better looking ½” wide black leather belting that I glued on with DAP contact cement. I think you’ll agree that the black leather offers a nice contrast to the multi-colored wood strips and complements the carbon fiber drum skin as well.
With your new drum built and ready to use, it is time man or woman up and find someone to drum with. I’m thinking the local nursing home is a good place to start. All kidding aside, you might want to think about forming your own drumming circle. If you do, part of the fun with the group could be building your own drums together. The method shown here is just one way to do it. From the drum group photo, you can see there are many ways to build a composite drum.
Building a composite drum would make an interesting project for Boy Scouts interested in working toward a composites merit badge. See Mike Barnard’s article Composites Merit Badge in Epoxyworks #38 for more on this merit badge.
Included also are a couple of other drums that were built with composite skins and epoxy. They all sound a bit different depending on the composite fibers used, the thickness of the skin, and whether or not they are attached to a drum body.
If you decide to build your own drum with composite drum skin, a good source for small amounts of composite fabric and WEST SYSTEM® Epoxy is at The Composites Store in Tehachapi, California.
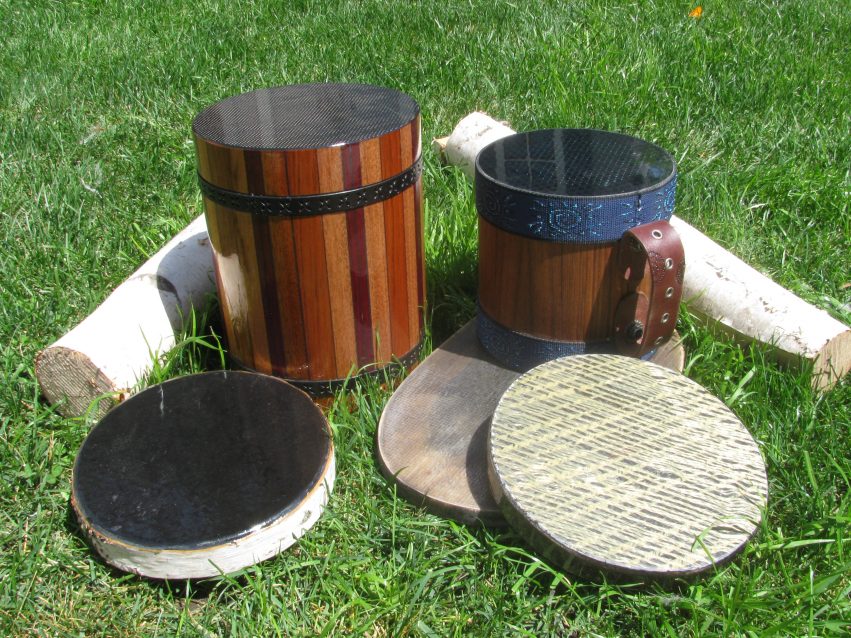


