

Editor’s note: this article was written in 2000, years before we formulated G/Flex 655 epoxy which has superior performance with plastics. The basic plastic boat repair methods described here still represent best practices, but for optimal results use these methods with G/flex 655 epoxy on plastics.
Molded plastic canoes and kayaks are incredibly tough and durable. Occasionally though people damage them and call us for repair recommendations. Considering that plastic film is often used as a mold release for epoxy, you can see what we’re up against when we try to bond to it.
Plastic’s bonding drawbacks
The most common plastics used for molded boats and other toys are low surface energy plastics such as polyethylene and polypropylene. Characteristics that make them desirable for the manufacture of small boats also make them difficult to bond to.
Low surface energy plastics are not able to overcome the surface tension of adhesives and therefore inhibit the spreading and wetting of the adhesive on the surface. These plastics are not porous and provide little opportunity for a mechanical bond. They are unreactive, or chemical resistant, inhibiting a chemical bond. Also, low molecular weight molecules tend to migrate to the surface of these plastics. Molecules with low molecular weight have low tensile strength, resulting in a weak boundary layer at the surface.
A repair that works
The repair method I’m about to describe overcomes some of these drawbacks and produces a functional repair. However, it will be fairly obvious that the boat has been repaired. In other words, it may not be pretty. Surface preparation, bonding area, and fiberglass preparation and placement are key to the success of this repair.
- Begin the repair by forcing the damaged section of hull back to its original shape.
- Clean the area with solvent and paper towels well beyond the break. Solvents will remove oil, wax or other contaminants that would inhibit bonding.
- Sand an area several inches beyond the break in all directions with 60 or 80 grit sand paper. Scratch the surface aggressively, making certain the entire repair surface has been abraded with no shiny places left. This step helps to overcome the plastic’s low porosity.
- Flame treat the surface. (See Flame treating a plastic surface for bonding below.) Flame treating will burn off contaminants and weak boundary layers and produce surface oxidization. Oxidation increases the surface energy allowing better wetout and makes the surface more reactive for potential chemical bonding.
- Apply a coat of clear epoxy to the surface within an hour or two of the flame treatment. The best bonds are formed soon after flame treatment.
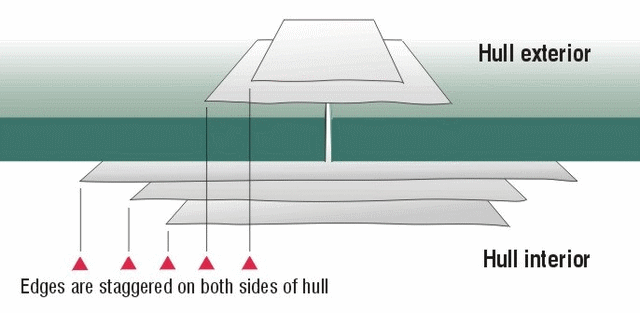
- Cut the fiberglass patches, making certain each layer is staggered in size from any other layer on either side of the repair. Cut the largest fiberglass patch to extend several inches beyond the actual break in the hull and at least two inches beyond the next smaller fiberglass layer. (See the comments on fiberglass preparation below.) It usually isn’t necessary to bevel the repair area.
- Repeat steps 2–7 on the backside of the hull. Stagger the ends of fiberglass patches on each side of the repair so they don’t end in the same place as layers on the opposite side. This allows the repair laminate to bend more uniformly when it is stressed.
- Sand the fiberglass to smooth out the edges of the fiberglass steps.
- Fair the stepped layers of glass with an application of epoxy thickened with a fairing filler if you wish to dress up the repair prior to painting. Sand the cured fairing compound and apply 2 sealer coats of epoxy to the area and allow to cure.
- Wet sand with 220-grit paper to prepare the surface for paint. Apply an automotive or other matching paint to finish the repair.
The center of repaired sections will be stiffer than the rest of the hull, but the edges of the repair will flex and stay attached under considerable abuse. How much abuse it will handle will depend on the surface preparation, how far the first layer of fiberglass is applied beyond the break, what weight fiberglass was used and how uniformly the repair layers have been staggered.
Flame treating a plastic surface for bonding
To flame treat a plastic surface, hold a propane torch flame about 4″ to 6″ from the plastic (with the tip of the flame just above the surface) and move it across the surface at a rate of 2 or 3 inches per second overlapping the previous pass slightly. Keep the torch moving and only allow the exhaust gases to hit the surface. If done correctly, the surface will not discolor or burn in any obvious way. This technique oxidizes the surface and improves adhesion. For best adhesion, bond to the surface within 30 minutes of treatment.
Fiberglass preparation
Use lightweight fiberglass fabric for the repair. One reason this repair works is because a single layer of 2 to 4 oz fiberglass and epoxy is flexible enough to bend to a fairly tight radius when cured. With the fiberglass stepped down to a single layer at the perimeter, the outer edges of the repair should be as flexible and bendable as the hull itself. This flexibility is helpful if someone severely dents the hull alongside the repair. It will reduce the likelihood the repair will peel or debond from the hull.
If the break in your hull is only a split or slight tear, three layers of 4 oz fiberglass or six layers of 2 oz fiberglass are usually adequate for this type of repair. Multiple layers of light fiberglass fabric are best. Two layers of 4 oz fiberglass (or four layers of 2 oz) are applied to the inside of the hull and one layer of 4 oz (or two layers of 2 oz) are applied to the outside of the break to complete a repair for canoes and kayaks. More layers are used on the inside because higher tensile loads are expected on the inside if there is an impact on the outside.
A good mail order source for light fiberglass fabrics ranging from .5 oz to 10 oz and other composite materials is CST – The Composites Store.


