Comparing Surface Prep Techniques
Spring 2001

GET STARTED
FREE PRINT & DIGITAL EDITIONS
Spring 2001
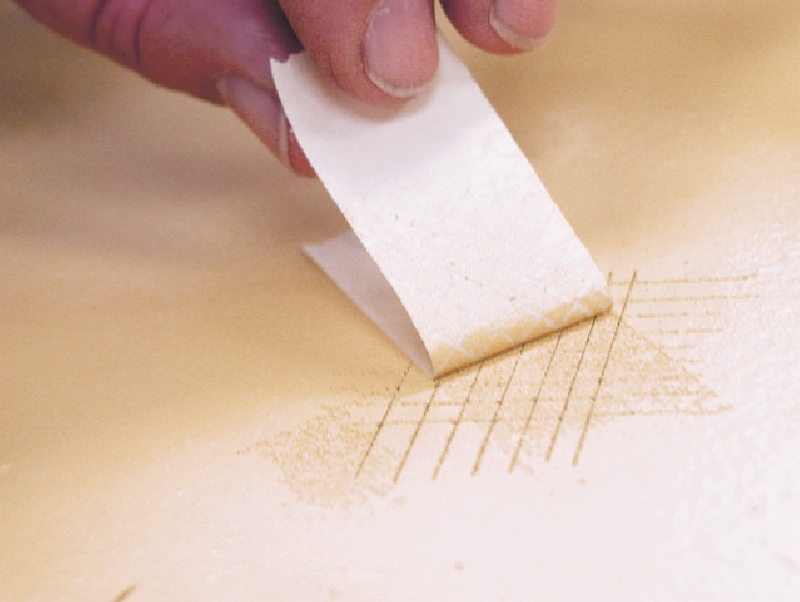
Above: Surface prep testing using ASTM D3359. This calls for a single-edged razor blade to score a pattern through the coating. Applying a strip of masking tape diagonally across the pattern, then pulling it slowly back over itself will reveal the relative degree of adhesion to the substrate or primer.
Before you begin a project, it is a good idea to consider all of your options. Information about products or methods you may want to use is often available on product labels, from manufacturers, or your own experience. However, many times the information you need to make good choices is just not available. Then your best option is to test. In our most recent sailboat renovation, we had to figure out what to test for and how to do it.
We spruced up the interior of our recently renovated 32-year-old Allied Seabreeze sailboat last winter. This called for refinishing all the dark-colored, wood grain high-pressure laminate (Formica™) surfaces. We were faced with a few options: remove the old Formica and replace it with new, apply a new laminate over the old, apply a wood veneer over the laminate, or paint the existing surface.

We like the traditional look referred to as the Herreshoff interior. This is a semi-gloss white or cream color accented with varnished mahogany trim. Our next decision was to paint or apply new laminate. We knew that applying new laminate would be a very large project, so we opted to paint. Before we committed ourselves, however, we wanted to be sure the paint would stick to the existing laminate surface. We needed to identify whether a primer was necessary and the best surface prep techniques. To do this, we developed a test matrix to compare the variables.
A properly designed test program can compare a number of variables quickly and provide workable solutions. I thought about the primers we had on hand and which paint to use. We had a few gallons of AWLGRIP 545™ and AWLGRIP Hi Build™ primers that we wanted to use, if possible. We also wanted to use a single part urethane like Interlux Brightside™. This gave us several materials to compare. But we also needed to know how to prep the surface so the coating would stick-another set of variables.
For a test surface that simulated our interior laminate surface, I purchased a 2′ x 3′ piece of black high-pressure laminate. The dark color was chosen to compare the hiding properties of each material and to make sure one coat of paint would be enough. I cleaned the laminate with lacquer thinner and white paper towels. Strips of masking tape were used to divide the surface into four vertical sections. (See diagram, above) These tape lines mark the boundaries of the different primers and paint. Strips of tape were applied to the panel horizontally to identify the boundaries of the three surface prep areas. This grid, with the X-axis for surface prep and the Y-axis for different coating combinations, gave us twelve prep and coating variables. As we laid out the grid, we realized that we needed to test surface prep on both the laminate surface and on the various primers, so the layout was developed accordingly and marked at both ends of the grid.
The bottom horizontal band received no preparation (other than the initial cleaning with lacquer thinner), the middle band was washed with water and a scrubber pad, and the top band was sanded with 80-grit sandpaper. The AWLGRIP 545 primer was mixed and applied to the first and second vertical sections and allowed to cure. After an overnight cure, the second 545 section was sanded with 80-grit sandpaper, and a coat of Hi-Build was applied over that section. The third vertical section also received a coat of Hi-Build.
After the primers were cured, the surfaces of the various primer combinations were prepped for paint. The top horizontal band was sanded with 120-grit sandpaper, the middle band was washed with water and a scrubber pad, and the lower band was left unprepared. One coat of Interlux Brightside single-part urethane paint was applied over the entire area. The paint was cured for 24 hours and then we performed the adhesion testing.
I used the American Standard for Testing Materials (ASTM) test number D3359 for testing the adhesion of the coatings. This test allowed me to check the adhesion of the primer to the laminate surface as well as the adhesion of the paint to the primer and the bare laminate surface at one time.
This test uses a single-edged razor blade to score a pattern of parallel lines approximately 1/8″ apart in a crosshatch pattern through the coating to the substrate. Then apply a strip of high-quality masking tape diagonally across the pattern, leaving the end of the tape up from the surface. Rub the tape hard onto the pattern, and then pull it slowly back over itself. If the paint lifts from the primer, then the coatings are not compatible, or the surface prep is not effective. By comparing the results from each of the areas, it is easy to determine which surface prep is most effective and which primer is most effective.
We did not feel confident with the adhesion of the paint to any of the surfaces after the first test. This first attempt only allowed the paint to cure for about 24 hours before testing, so we waited another 48 hours and repeated the test. After 3 days of curing, the results were much better for some of the test sections, but not on all of them. We made a decision based on these results. In this case, the best results were obtained by sanding the laminate with 80-grit production paper, coating with the AWLGRIP 545 primer, sanding the primer with 120-grit sandpaper, and applying one coat of Interlux Brightside over that.
We added some flattening paste to the Brightside paint to tone down the shine and create a semi-gloss surface. We applied all coatings with a brush and roller. The paint flowed out nicely, and the results were great, providing the traditional interior we were looking for.
Anyone can do this type of testing and learn a great deal. While the results we obtained in this test apply directly to our project, they may not be the perfect combination for other substrates or primer/paint combinations. The point is to think through the project and take the time to compare several options before committing time and additional materials. Doing your own testing should prevent frustration and heartache later and ensure quality results.


