

by Ken Newell
The Zatara refit project began two years ago when my partner Steve Gallo (a mortgage banker) and myself, Ken Newell (a materials engineer), decided that we wanted something to do with our spare time and money. What we didn’t realize was the level to which the refit project would absorb every weekend and every non-critical dollar we had and cause our significant others to chastise us for our obsessive behavior.

Nonetheless, our goal is to transform a good weekend sailing vessel into a world-class bluewater cruising yacht equipped with everything necessary to safely and comfortably circumnavigate the globe-well, maybe just Mexico and possibly Costa Rica.
Zatara is a 1979 custom-built 50′ cutter with nice deck lines, a great interior, and basic amenities for long-distance cruising. While she lacks many of the modern conveniences of electronics and rugged sail handling hardware, she has all the right stuff to justify a refit: 300-gallon fuel capacity; 500-gallon freshwater tanks; and a solid ¾”-thick, hand-laid glass hull, and full keel, unlike those of the mass-produced type being plopped in the water these days.
At some time, Zatara’s previous owner decided that the original teak deck was too much trouble to maintain and had pulled it up and paid for a fiberglass deck to be laid. Years of sailing ultimately introduced stress cracks in the fiberglass, resulting in a much less than watertight deck.
We found old pictures from the early eighties on the wall at Doug’s Harbor Reef on Catalina Island of Zatara when she still sported her teak decks. Those pictures quickly convinced us that installing new teak would return the boat to her original glory.
Preparing the deck
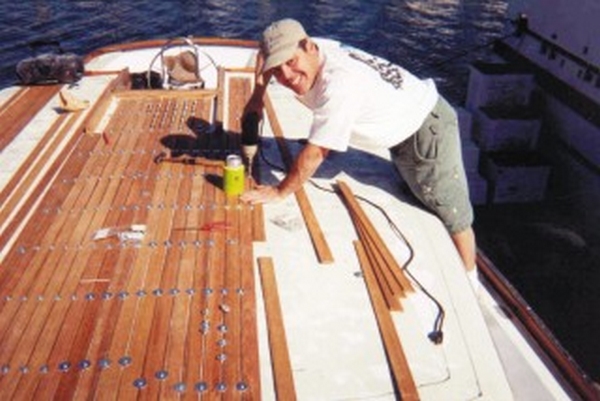
Steve and I spent several months stripping away the original hardware, cockpit teak trim, mast, stanchions, doghouse windows and deck non-skid in preparation for laying teak. During this time, we researched every boatbuilding book, web site, and old salt shipwright we could to learn how to lay a teak deck. After all the research and surveys of teak deck owners, we determined that the best method for laying teak planking on an existing glass deck was that described in the WEST SYSTEM® Fiberglass Boat Repair & Restoration manual for the installation of teak veneers. We planned to start with the doghouse for practice, using 1/4″ teak veneers straight laid. Using the wisdom gained from mistakes on the doghouse, we then planned to steam lay the deck with sprung 3/8″ strips, 3/8″ thick king plank, and 1/2″ margin boards cut to fit. (Having a firm grasp of the terminology prior to doing the job is critical, as nobody in the marina will believe you know what you are doing otherwise.)
Decking the doghouse
According to the WEST SYSTEM literature, “installing a teak veneer deck is a practical and beautiful option for finishing a deck repair. Teak veneers can also be applied to decks, seats, cabin tops or hatches to improve the looks and value of any boat.” Of course, we decided that we would test every aspect of this statement. To install teak on the doghouse, we followed the steps in the repair manual:
-
- Plan the location and pattern for the layout of the teak strips. Cut the strips to fit and mark them for reference as necessary.
- Prepare the bonding surfaces. Clean with a wax and silicone remover or solvent and abrade smooth surfaces with 50-grit sandpaper.
- Place the first set of teak strips in the desired location and mark the bonding area and reference location points on the strips and deck. Also, make sure you clearly mark the locations of each screw and washer on the planks of teak as these will be your only means of locating your screw holes when fastening the planks down into the epoxy bed. It is also helpful to number each plank in order to reference the location relative to neighboring planks.

- Wet out the bonding surface of the first set of teak strips and the corresponding bonding area of the deck. Remember to solvent wipe the bonding surfaces of the teak 30 minutes before the wet-out. Apply a heavy layer of thickened WEST SYSTEM® 105/206 epoxy to the wet-out deck surface. Thicken the resin/hardener mixture to a mayonnaise consistency with 404 High-Density Filler. Then add enough 423 Graphite Powder to turn the mixture to an opaque black color. Apply enough thickened epoxy to bridge gaps between the strips and the deck and to squeeze up and fill the gap between the planks. Be sure to leave reference marks uncovered.
- Position the first set of strips on the deck. Use the reference marks as necessary.
- Clamp the strips in place with #10 sheet metal screws and large washers. Place the screws and washers between the strips, 8″ apart. Each row of screws will clamp the edges of two adjoining planks and act as spacers (below). Coat the screws and washers with a mold release (cooking non-stick spray) or place a small sheet of plastic under the washers to prevent bonding. Push adjoining strips tight against the screws before tightening the screws completely. Tighten the screws enough to hold the strips firmly and force some of the epoxy mixture to squeeze up between the strips.
7. Bond the remaining strips in place, several at a time, following the same procedure.
8. Remove the screws and washers within 24 hours.
Fill the screw holes and remaining gaps between planks with epoxy/404/graphite mixture. A syringe loaded with the mixture will speed the process of filling the holes.
9. Sand to level the surface and remove saw marks from the teak surface. Use a belt sander or disc sander with 50-grit sandpaper for the initial sanding. A commercial floor sander works well for large decks. Finish with 80-grit and then 120-grit sandpaper. The teak surface may be left natural or finished with marine-grade teak oil, marine varnish or WEST SYSTEM™ 105 Resin/207 Hardener and a high-quality two-part polyurethane varnish.
Beginning the deck
Once we had completed the top of the doghouse, we researched how to bend teak planks to achieve a sprung plank layout. After visiting a few websites for steam bending wood, we developed our own low-cost portable design for steam bending teak planks. It uses 4″ diameter PVC tubing, 4″ bolts, portable saw horses, PVC end caps, a gasoline can, and propane camping burners. Its total cost was $180, and it let us steam four planks of teak at a time.
Steam bending teak planks
Steam bending teak is quite an art. However, for our job, which required edge bending 3/8″ x 1¾” x 12′ teak planks, the process is relatively simple. The primary requirement for successfully bending teak planks is to maintain a hot flow of steam across the planks for at least one hour prior to bending. If the steam stagnates inside the tube, it cools and precipitates on the wood, preventing the wood from achieving the temperatures needed to bend. To prevent this, we drilled holes through the tube at 12″ spacing to allow the steam to escape. To keep the wood from sitting in the precipitated water at the bottom of the tube, we built elevated platforms for the planks so that the steam could come into contact with the entire surface. Placing 4″ bolts through the sides of the PVC tube at 3′ intervals provided a simple method for achieving this.
For our steam bending, we found that two gallons of water would last for 6-8 hours and consume approximately four 16 oz bottles of Coleman propane. In all, we used over 30 bottles of propane. We recommend buying two propane burners in order to make the bottle change quickly enough to maintain the boiling point of the water.
Sanding the deck
Preparing the fiberglass deck prior to installing the teak is critical if the teak and epoxy are to bond successfully and last for years. Using an industrial hardwood floor sander with 40-grit paper was the best method to prepare our deck. These can be rented for approximately $100/day. Using the industrial sander and a couple of edge sanders, we prepared the deck in approximately 10 hours. The 40-grit paper leaves deep grooves, which enable the epoxy to achieve maximum grip. In fact, we found that once fully cured, the epoxy/404/graphite blend was stronger than the fiberglass deck and the teak itself.
Fitting margin boards
After the deck had been completely sanded and all the hardware removed, it was time to layout the margin boards. We decided to use ½” thick margin boards to form a flow path for water towards the drains and to prevent pooling of water along our toe rail. Our margin boards are 3½” wide and are joined using a serpentine joint. We chose the serpentine joint mostly for esthetics; however, it is an easily repeated pattern that accepts variations in outside edge camber.
Positioning and clamping the margin boards along the toe rail was somewhat challenging since we did not want to drill holes through the teak itself. Therefore, we used screws and washers along the outer edge and clamps along the inner edge. This method proved to be very successful. Since the margin boards are the reference edge for laying the steam-bent planks, we wanted to have all the margin boards cut and bonded to the deck before we started laying planks.
Dry plank layout
Starting from the edge of the margin boards and working inward from port and starboard, we began dry laying the steamed teak planks in the sprung position to force the teak to take and hold the curve of the outer plan form of the foredeck.
We found that several 4′ Quick-Grip™ bar clamps helped considerably when pulling the plank into its bent position. Further in towards the midsection of the deck, we used a Motivator (used for laying tile) which uses a ratcheting strap to span the wider sections of the foredeck.
Steam bending and dry laying the foredeck required approximately 100 hours (two months of weekend-only work) with two people working and numerous beer breaks. We expected bonding the planks to the deck to take the same amount of time.
Bonding the planks
Probably the most difficult aspect of laying a teak deck is the repetition of the process. Once we had completed the dry lay of all the planks, we had the sheer pleasure of removing all 2500 screws and 500 odd steam-bent planks just so we could repeat the process all over again for bonding! However, before beginning to remove those screws and planks, it was very important to mark the position of every screw and washer relative to each plank and number each plank in an easily identifiable manner. In addition, every joint between planks needed to be marked for trimming, and centerline planks needed to be precisely marked for the king plank pattern of choice.
When bonding the planks to the deck, it is important to do small sections per batch of epoxy/404 High-Density filler/graphite. On the foredeck, we found that dealing with the curvature reduced the number of planks that we could bond in a 30-minute interval. It took two or three people with quick hands driving a screw and washer every 10-15 seconds to maintain pace with the epoxy cure time. Although it was sometimes very tempting to lay sections of planks, we realized that racing against the cure time was far too risky. After one attempt, in which the epoxy started to cure before we got all our planks in place, it required far more time to remove excess epoxy as it was hardening than it would have to lay fewer planks.
Bonding the sprung planks is extremely dirty and a considerable amount of the epoxy/ 404 High-Density filler/graphite blend gets on the top surface of the teak planks. After a while, we abandoned the effort to clean the planks since we were going to be covering them completely later in order to fill the grooves. In total, the final shaping and bonding of the sprung planks and trim sections took us four full weekends or approximately 160 man (and a few woman) hours.
Producing the king plank
Once all the planks were bonded, we started the tedious task of producing trim and king plank patterns. We found that the most efficient method for producing accurate patterns of complex trim sections and curves was the use of thick construction paper, masking tape and a brightly colored wax crayon. By tightly masking the thick paper over the section being patterned and lightly rubbing the edge of the crayon over the paper, we could easily transfer the exact edges of the planks to the paper.
We then cut out the patterns and tacked them directly to the teak using 3M™ spray adhesive. Once the pattern was on the teak, we hand drew 3/16″ margins onto the pattern and then used a band saw to follow the margin lines on the pattern to produce perfectly fitting curves. We cut the king planks and trim from ½”-thick x 10″ x 8′ pre-cut and planed boards. The teak required for the king planks and trim cost considerably more than expected, approximately $800. Although we made every effort to minimize scrap, we found ourselves with two full boxes of oddly shaped ½” scrap teak for which we hope eventually to find a good use. In the meantime, we try not to think about it much.
Producing paper patterns and cutting all the king planks and trim sections required another three full weekends or approximately 140 man-hours. We needed an additional day to bond the king planks and trim boards into position and thus complete the bonding part of the job. At this point, the teak deck was in position and looked absolutely filthy with black epoxy everywhere. Our fellow boaters were certain we’d lost our minds and wasted lots of money. But the hard part was over.
Filling and finishing
The next step was filling the grooves between the planks with epoxy/404/graphite. (Generally, polysulfide caulk should be used to fill the grooves in 3/8″-thick planks unless they are thoroughly dry.) Before filling the grooves, we used syringes filled with a low viscosity blend of epoxy/ 404/graphite to fill every one of the 2500 screw holes. This took us approximately 6 hours with two people working. Filling the screw holes is extremely important to assure a watertight deck.
Once all the grooves were filled, the fun and extremely dirty part began-the dreaded sanding. Using industrial floor sanders is the best way to achieve a smoothly sanded deck in a reasonable period of time. A large orbital sander with 60-grit pads can remove a large quantity of material quickly. In fact, we sanded off 160 pounds of teak and filler in just 12 hours. Neighbors truly love this, so try to sand on a weekday with no wind and fewer people at the marina.
After doing most of the sanding with the orbital and 60-grit pads followed by 80-grit, we rented a large finish-sander and lots of 120-grit screen in order to achieve a swirl-free finish. Sanding and finishing took two full weekends and $300 in sander rentals and pads. After completing the finish sanding and removing all swirl marks, we were ready to hydro-wash the teak deck to remove the fine teak dust trapped in the pores and grains of the planks. This step is very important to achieve the brightest golden hue from the teak deck. After pressure washing, allow the deck to dry for a day before applying oil or finish.
Finally, the day came to reveal our labor of love, hundreds of hours of time, and thousands of dollars in materials. Most importantly, we could show everyone at the marina that we really did know what we were doing!
If you think that applying a teak deck or teak veneers might be a project for you, here’s an itemized account of everything that goes into such a large job. This list is based on a 360 square foot deck space (considerably more than most 45-50′ boats). It should provide some insight as to the cost of such a project in terms of primary materials, tools and time.
Material list (2002 pricing)
| Quantity | Item | Cost | Source |
| 10 gal | WEST SYSTEM™ Epoxy | $640.00 | |
| 1 pr | 300 Mini Pumps | $10.00 | |
| 80 oz | 423 Graphite | $70.00 | |
| 60 lb | 404 High-Density Filler | $315.00 | |
| 100 | 83 oz mixing tubs | $75.00 | |
| 2,500 | #10×1¼” zinc sheet metal screws | $89.00 | McMaster-Carr |
| 2,500 | Zinc plated washers | $67.00 | McMaster-Carr |
| 600 | Latex gloves | $50.00 | McMaster-Carr |
| 10 | Slab cut rough teak 8/4×10″x12′ | $4,000.00 | Bohnhoff Lumber |
| 20 | Milled teak 2/4×10″x6′ | $1,500.00 | Austins Hardwood |
| 5 gal | Acetone | $50.00 | Ace Hardware |
| 4 | 4′ Quick-Grip™ bar clamps | $100.00 | Home Depot |
| 10 | Large spring clamps | $60.00 | Home Depot |
| 4 | Phillips head bit kits | $40.00 | Home Depot |
| 8 boxes | Shop rags | $45.00 | Ace Hardware |
| 108 | 1½” and 3″ disposable putty knives | $53.00 | McMaster-Carr |
| 15 | 1½”x60′ blue masking tape | $97.00 | McMaster-Carr |
| 1 | Ryobi portable band saw | $198.00 | Home Depot |
| 2 | Ryobi 18V drivers | $178.00 | Home Depot |
| 1 | Delta chop saw | $98.00 | Home Depot |
| 2 | Makita orbital sanders | $189.00 | Home Depot |
| 1 | Makita belt sander | $148.00 | Home Depot |
| 1 | Makita 1200 rpm grinder | $129.00 | Home Depot |
| 10 | Grinder disks (20 grit) | $30.00 | McMaster-Carr |
| 500 | Sanding disks (60/120 grit) | $189.00 | McMaster-Carr |
| 2 days | Drum sander rental | $120.00 | Home Depot |
| 4 | 20 grit drum pads | $50.00 | Home Depot |
| 3 days | Disc sander rental | $160.00 | Home Depot |
| 3 days | Orbital finish sander rental | $160.00 | Home Depot |
| 10 | Sanding pads (60/80/120 grit) | $120.00 | Home Depot |
| 1 day | Hydrosprayer rental | $40.00 | Home Depot |
| Materials and supplies grand total | $9,070.00 | ||
| Estimated labor total man-hours | $850 | ||
In addition to the costs listed above, we also estimate approximately $2000 worth of incidental expenses such as drill bits, knives, shop vac, Vise Grips™, hammers, and cell phones, all of which are now located at the bottom of our slip. From this experience, we hypothesized a new gravitational relationship between the value of an object and its attraction to water. We believe it to be exponential.


