- Furniture
- Arts & Crafts
- Casting & Pouring
- Shop Talk
- Home Repair, Restoration & Improvement
- Techniques & Tips


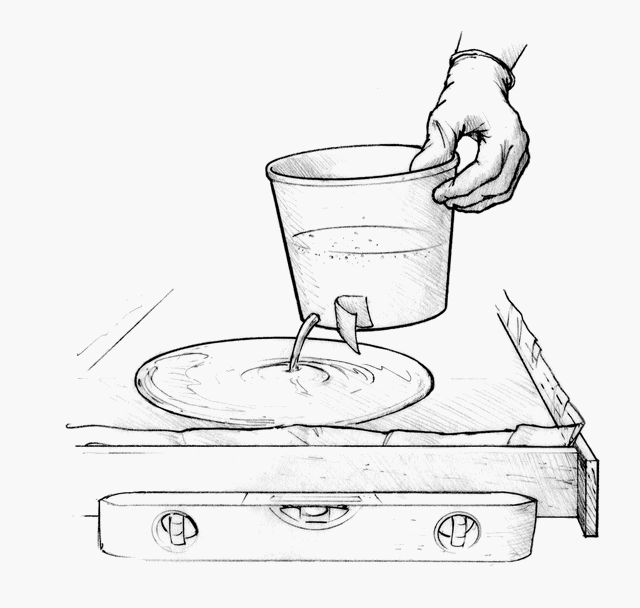
Above: A handle trick when you want to cast an epoxy tabletop is to warm epoxy resin and hardener to 80° F to reduce viscosity, then let it pour from a puncture in your mixing cup. These steps will eliminate most bubbles behind.
Pouring a thick coating of epoxy onto a tabletop can produce a unique effect. With a ¼” thick coating, you can cast an epoxy tabletop with a variety of objects covered in the epoxy for decorative accents. Coins, fabrics, sticks of wood, memorabilia, and photographs have been used in this decoupage application. Here are a few tricks to make things go more smoothly.
Photographs will darken when wetted with epoxy. They should first be coated with a decoupage glue like Mod Podge™ to prevent discoloration, curling, and wetting with the epoxy. Porous materials like burlap trap a lot of air and are more susceptible to bubble-related problems than items like coins.
For a sealer coat, figure 40 square feet per pound of mixed material. For a typical “flow coat” over a sealed surface, about 1/8″ thick, figure 0.75 pounds per square foot (a Group size A 105 Resin/207 Special Clear Hardener weighs 3.11 lb). Use this to estimate how much to buy and to mix depending on the desired thickness and the area to be covered.
For best clear finish applications when casting an epoxy tabletop, use WEST SYSTEM 207 Special Clear Hardener® with 105 Resin. Warm the resin and hardener before dispensing to about 80°F to reduce viscosity.
If Mini-Pumps pump too slowly, you can mix the epoxy by volume. Refer to the hardener label for the correct volume mix ratio. When working with large volumes of mixed epoxy, keep in mind the shorter pot life and risk of exotherm. Use a slower hardener, preferably 207 Special Clear Hardener.
Dam the perimeter to prevent drainage. Duct tape around the bottom edge of the tabletop will prevent the epoxy from dripping. For coatings ¼” thick, tack a piece of stock molding with 6 mil plastic under it around the table’s perimeter. Be sure the tabletop is level!
Bubbles trapped in the coating of a casted epoxy tabletop are usually not desirable. To avoid the bubbles from outgassing, it’s best to seal the substrate before pouring the thicker coating. Allow the substrate temperature to stabilize. (Expanding air will be expelled from the material as its temperature rises.) First, apply a thin coat of epoxy to the substrate. Then pour the thick coat on after the initial coating becomes tack free. For more information on preventing bubbles, see Bubble-Free Epoxy Coating.
Poke a ¼” diameter hole in the corner of a mixing pot, such as our 805 poly mixing pot or a margarine tub. For a larger project, use a coffee can.
Place duct tape over the hole. Mix the resin and hardener thoroughly, and allow it to stand for about one minute so the bubbles rise to the surface. Peel back the tape covering the hole and allow de-aerated epoxy to flow onto the table surface (left). Pour close to the surface so the epoxy does not splash or create air upon striking the surface. Stop the hole with tape when the container is nearly empty-so bubbly epoxy isn’t poured onto the surface.
If bubbles occur (most likely around objects and porous material) pass a hairdryer over the surface to temporarily reduce viscosity and allow the bubbles to rise and burst. The hairdryer also helps the epoxy to self-level. Be careful not to overheat it.
It’s always a good idea to practice a technique like this on a smaller scale before encapsulating valuable or one-of-a-kind objects.
When the epoxy has cured, wipe the surface with furniture wax for a lustrous finish. Be careful to use coasters with very hot beverages, as excessive heat can stain the coating. Scratches or flaws in thick coatings can be buffed out with a buffing compound. For deeper scratches or minor flaws in the surface, wet sand with 600-grit followed by 1000-grit before buffing.