

By Terry Monville – GBI Technical Advisor
Taking the time to do quick, rough calculations at the beginning of a project can help you save on money and frustration in the long run. This can be especially helpful if you’re new to working with epoxy and haven’t quite developed the intuition yet for how far your epoxy will go. Here are some numbers we’ve collected over the years for estimating epoxy coverage when working with our WEST SYSTEM® Accessories.
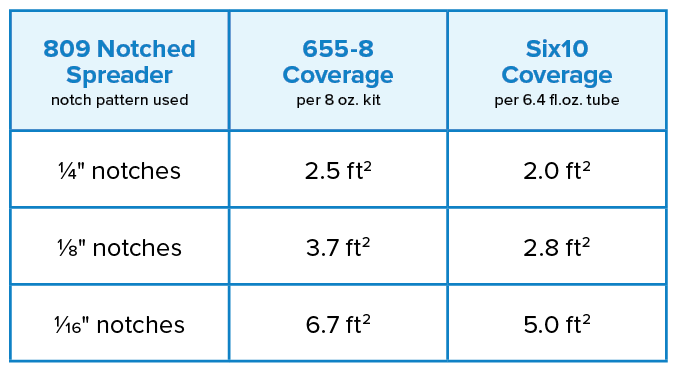
Spreading Epoxy with an 809 Notched Spreader
The WEST SYSTEM 809 Notched Spreader is a great tool to know how thick you are applying epoxy.
I use the 809 Notched Spreader for spreading neat epoxy on tabletops for an even film thickness or for spreading thickened epoxy when bonding and fairing.
With neat (unthickened epoxy), the peaks will flow out, leaving an even film coverage. Using the ¼” notch side to spread 105 Epoxy Resin® mixed with 207 Special Clear Hardener® on a waxed glass surface, results in about 3.2 oz. of epoxy per square foot, with a film thickness of 35 mils. When coating wood or other porous surfaces, the epoxy would soak in and have a thinner finish unless the surface is sealed with epoxy before doing the flood coat.
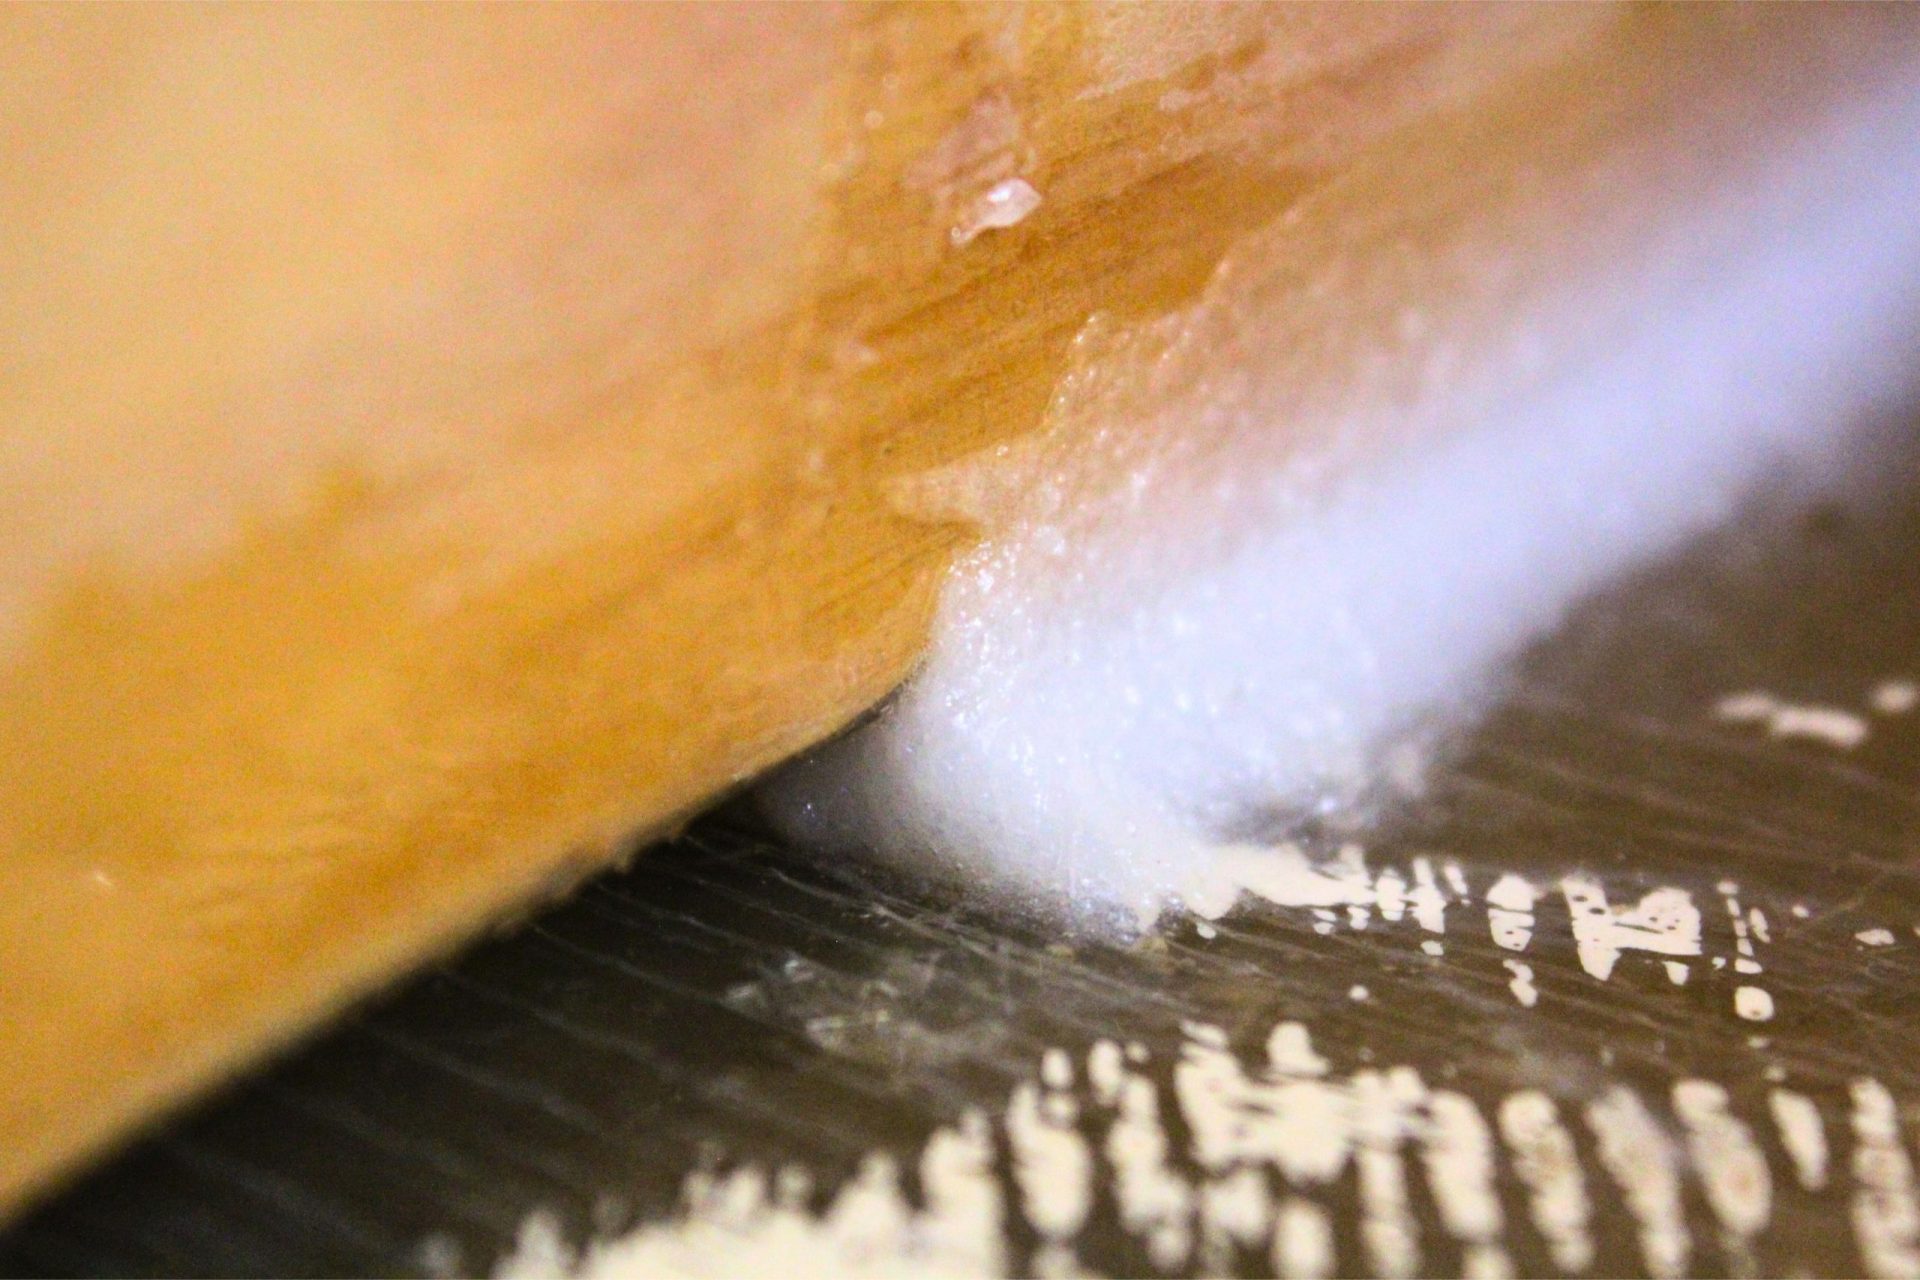
The 809 Notched Spreader is also helpful for working with thickened 105/20X and our specialty epoxy systems. G/flex® 655 Thickened Epoxy Adhesive and Six10® Thickened Epoxy Adhesive are pre-thickened. When using the 809 Notched Spreader, it will leave behind V shape ridges in the thickened epoxy. This works great for bonding because it creates a consistent thickness bond line and the grooves will allow air to escape when the parts are assembled.
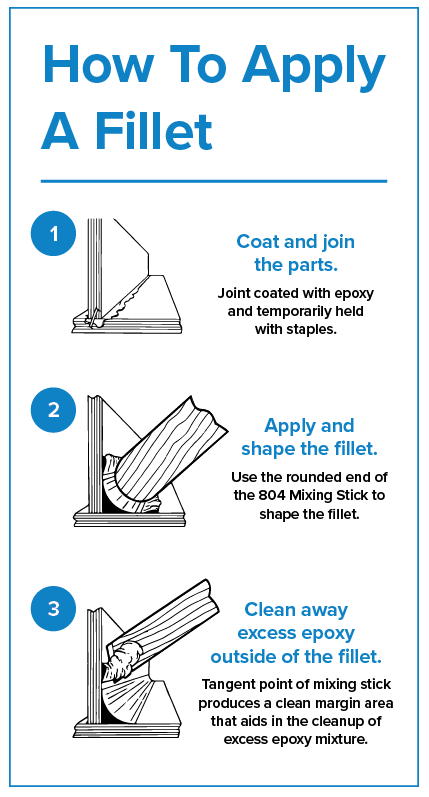
Fillets with 804 Reusable Mixing Stick
It is common practice to create a thickened epoxy fillet in corners so fiberglass can make a smooth transition between surfaces. You can use the round end of our 804 Reusable Mixing Sticks to create a nice 3/8″ radius for just that purpose.
Hold the stick 90° to the corner to create a nice 3/8″ radius fillet. This is a good fillet shape for preventing air bubbles in a corner when applying lightweight fiberglass fabric. If you’re holding the stick at 45°, the radius will fatten up and give a more gradual transition for medium-weight fabrics.
Curious how far your epoxy will go? Check out these data points:
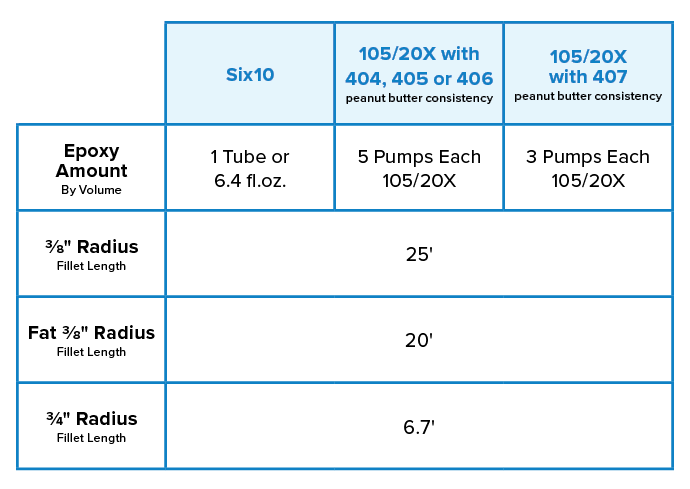
There are three things in particular I would like to draw your attention to from the table:
- When you double the radius of the fillet (3/8″ to ¾”), you use more than twice as much volume of epoxy.
- Fillets can be done with 407 Low-Density Filler, but it will have about half the strength as they would if using one of our higher-density fillers (404, 405, or 406).
- When using the higher density fillers, the filler does not have much impact on the overall volume of the final mixed epoxy and filler. When using 407 Low-Density Filler to thicken your epoxy, the final mixed volume will increase in size. To thicken 3 fl.oz. of epoxy with 407 Low-Density Filler to a peanut butter consistency, the resulting mixture will be about 6 fl.oz.
Cartridges and Fillable Caulking Tubes
 Laying a consistent bead of epoxy is easiest done with a caulk tube. Six10 conveniently comes packaged in a unique, two-part caulking tube that can be dispensed with a standard caulk gun. You can cut the tip for a ¼” bead opening and, if you can lay down a perfect ¼” diameter bead, you will get 16′ of epoxy. Though most of us are not skilled enough to lay down a perfect bead, 16′ is good enough for estimating.
If you want the caulk tube application experience, but Six10 is not quite the epoxy you need, we do offer our 810 Fillable Caulking Tubes. Simply fill the tube with your thickened epoxy of choice, and you can lay down a ¼” bead as easily as you would with Six10. These tubes hold about 10 fl.oz. (as opposed to Six10’s nearly 6.5 fl.oz.), so the expert bead layer should be able to get almost 25′ out of a ¼” bead using the 810 Fillable Caulking Tubes.
With either of these tubes, do not use a rodless pneumatic caulk gun. These are not compatible and can cause the epoxy to squeeze out the back. With the Six10 tubes, it can also cause the epoxy to be dispensed at the incorrect ratio. If using a powered caulk gun, you need to use one with a physical plunger.
When working with accessories, there’s always going to be a fair amount of fluctuation in epoxy use amount due to the individual who’s using the accessories. Estimating off the cuff how much is just enough epoxy, without running short, takes years of practice and a bit of luck. However, having some hard numbers to reference will help you build your intuition more quickly, and make you a more efficient epoxy user. Taking a little extra time to do your calculations will pay dividends in the end.
[insert Calculating-Epoxy Fillet-Graphic]


