

By Jeff McAffer
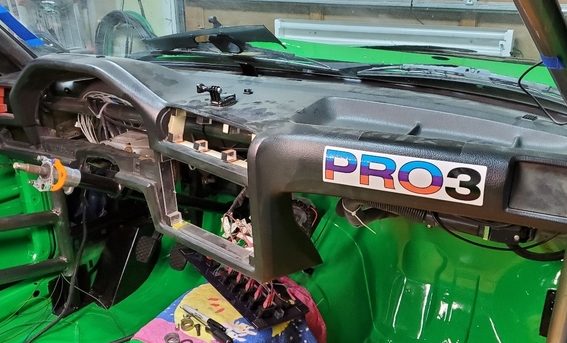
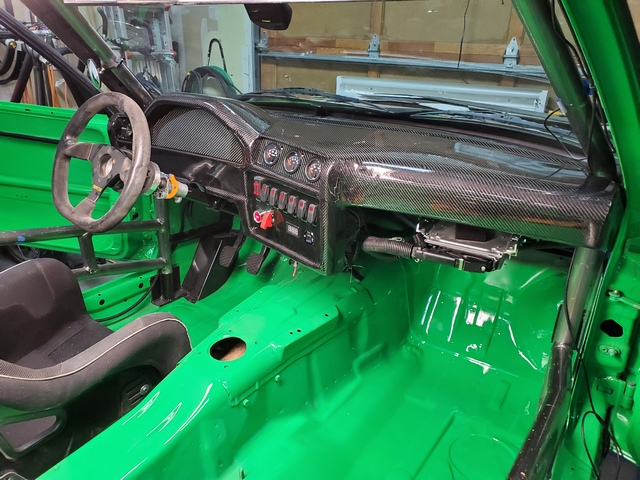
It all started when I got a new 360-degree camera for my racecar. Mounted on the dash, it captures a really cool perspective that allows viewers to see forward, watch cars as I pass them, and to see what I’m doing (check it out at youtube.com/user/jeffmcaffer). Unfortunately, the dash produced considerable glare on the windshield. As you can see in the photo, it also had various holes and divots that were not useful in a racecar such as a coin tray, air conditioning vents, and extra switch panels. I wanted to fill those in. But how?
After considering options like a vinyl wrap, flocking, or paint, I decided carbon fiber “skinning” was the best approach for keeping within the racecar theme. The internet offers many videos on how to do it, some good, some less so. Overall, it looked challenging due to the compound curves of the dash—but feasible. The search for materials was on.
As a recovering boat owner, I was aware of WEST SYSTEM® Epoxy. In my research, I discovered that the 105 Resin®/207 Special Clear Hardener® combo was used on some furniture projects and they looked good! I had a few questions about their use in a skinning project and talked to Gougeon technical advisor Don Gutzmer. He was prompt with email replies and even called me as the project progressed so we could walk through the process step-by-step.
There were several other options locally and on the web, and even some dedicated skinning kits, but ultimately WEST SYSTEM products were the best option for me. The ease of dispensing resin and hardener with calibrated 300 Mini Pumps, the proven robustness of the epoxies, and the amazing customer service from Don, sealed the deal. I decided on G/flex® 650 Toughened Epoxy with some 502 Black Pigment for the base coat. Don suggested G/Flex to provide a great bonding layer on the sanded and flame treated vinyl of the dash. Over that, I would put one layer of 270 gsm Web-Lock® carbon fiber and quite a few coats of 105 Resin/207 Special Clear Hardener.
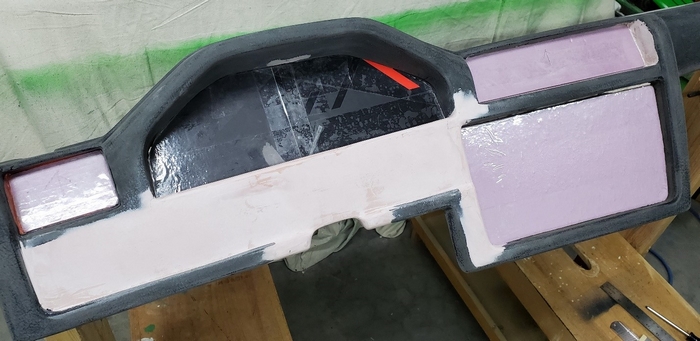
The first step was to cut off all the bits I didn’t want and fill in the unused areas to clean up the profile. Here you can see spray foam (white) filling the top tray and unused air vent. I also used this foam to change the profile of the center console. The wide pink foam insulation board along the bottom left creates the new profile by filling in areas that previously had switches and a trim piece.

I faired the surface with 105 Resin/207 Special Clear Hardener thickened with 410 Microlight® Fairing Filler. Above you can see the dash after trimming, sanding, and fairing the patched areas. In retrospect, I probably spent too long trying to get these super smooth and contoured. The epoxy and carbon fabric really masked any imperfections. Getting the edges of the fabric straight and clean was key for trimming the carbon later.
In the previous dash setup, all the instruments and switch panels were mounted with no visible fasteners using 3M Dual Lock® re-closable fasteners, which work really well. To continue using that, I needed a lip or flange inside the holes where the panels sit. I made either foam or cardboard backing blocks for each hole, covered them in packing tape to prevent the epoxy from sticking, and then bonded in a 2″ wide strip of carbon fiber all the way around each hole—half on the dash, half on the backing block. You can see the resulting flange in later photos.

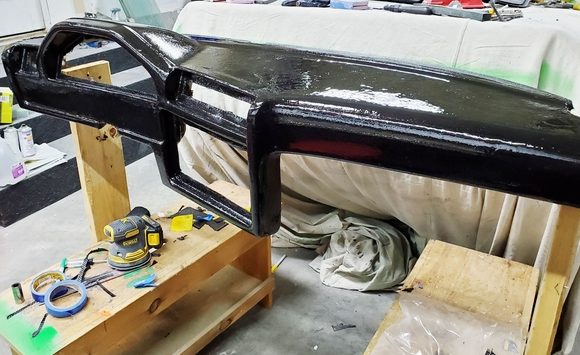
To skin the dash, I started by mixing small batches of G/flex 650 and applied with a brush. Don had warned me that it was pretty viscous. He wasn’t kidding. It’s cold here in Seattle, Washington in the winter, so I had to make sure to get the garage warmed first. I mixed and applied the G/flex to the surface once the garage was warm. I let the application of G/flex cure to a tack stage before enlisting help from my daughter to start laying the fabric on the surface.
The next steps did not start well. The first challenge I ran into was with the fabric, which turned out to have a flaw. It’s a long story, but there was a spider’s web of white filaments spun right in the middle of the good side. I hadn’t noticed as all my work in measuring and cutting had been on the “back.” I spent a bunch of time trying to clean the mess. I got it good enough and ventured back to the garage.
Challenge number two: I was overly optimistic about the flexibility of the fabric and its conformance to compound curves. I worked from the center out on the top and got it reasonably laid down. But I was naively trying to do the whole dash in one go with a single piece of fabric. Yeah, well, that wasn’t gonna happen.
Next, I ran into challenge number three. Messing around, cleaning the fabric, and laying it on the top took a long time, and the G/flex was losing its tack. Oh, that was frustrating. In the end, I swore some, ripped off the fabric, and took a break. Sorry, no pics. It was all too maddening to stop and capture the moment.
Key lessons: Check all the materials before beginning time-critical steps, and keep track of the time.
After recovering, I scuffed up the G/flex base and used 105 Resin/207 Special Clear Hardener to lay up the dash in pieces. The picture shows the forward edge and top surface. It turns out that with a bit of planning you can make butt joints nearly invisible—find existing cracks or seams, corners, etc. to distract the eye from the joint.
One thing I did learn, though not quickly enough, is that for carbon skinning you really need to make sure the fabric stays in contact with the base layer of epoxy while it’s curing. I was using fabric with Web-Lock on one side. This is a web of very thin fibers that keep the carbon fibers all lined up. That’s great for handling, but I suspect it makes the fabric a bit less conformant. I got inventive with blue painter’s tape as you can see here. Honestly, I would get even more aggressive with “clamping” the fabric to the base layer of epoxy if I were to do it again. This is, in my opinion, a critical part of the process. I’d also leave more fabric around the edges to facilitate tensioning.
The net result of getting it wrong is that it bulges and then you must be very careful when sanding. In addition, it will just look bad. I had a few bulges but mostly was able to tame them with liberal amounts of epoxy and careful shaping.
After applying several more coats of epoxy over the face and then the whole dash, followed by a judicious amount of sanding/fairing, it was ready for clear coating. Velvety smooth.
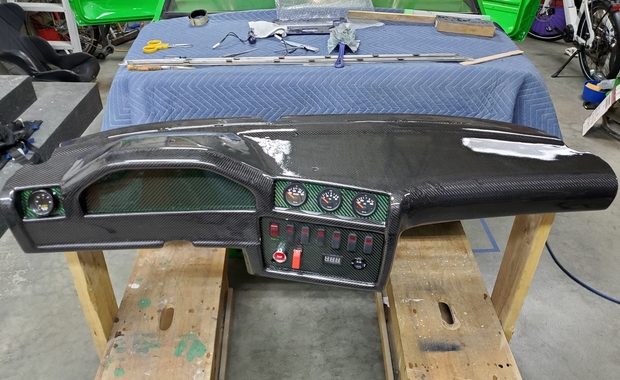
The spray-on clear coat gives the dash full UV protection and a great big shine. Overall, it’s pretty delicious. The top will end up partially covered in matte vinyl to cut the glare, but the rest will be eye candy to make all the other racers jealous, and I hear that this will add at least 5 horsepower to the car.
In a whole separate workstream, I wanted to make carbon fiber panels to hold gauges, switches, and fill the area where the instrument cluster was. For this, I used some fiberglass I had around the shop and some very cool fabric that has a green metal wire woven through-a nice accent given the car is all green.
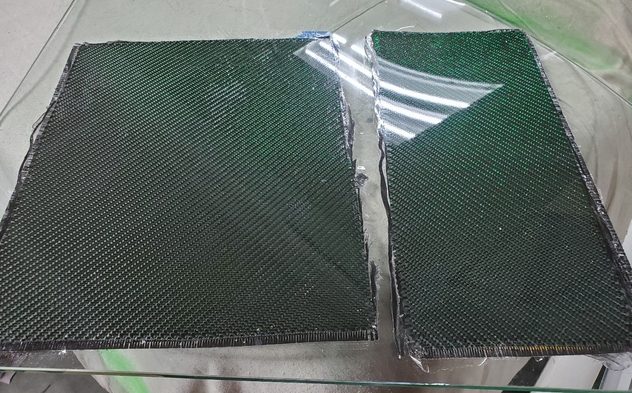
I made two pieces, each a simple lay-up of four layers on a glass plate, one layer of the cool green carbon fiber, and then three layers of standard carbon fiber each rotated 45 degrees for uniform rigidity. I made larger flat panels for the switches and gauges. There was also a rectangular curved panel for the instrument cluster. I used the gently curved driver’s side window of the car as the form.
Above are two of the panels fresh off the glass plate. You can see the green hue and the shiny reflection of the overhead lights. It’s amazing how well the epoxy mimics the form of the glass for a smooth, clean result. Despite my best efforts, there were some little bubbles or holes where not enough epoxy got between the glass and the first layer of fabric. In the end, I was going to do a top coat of epoxy anyway but you should really go to town with the first layer of epoxy if you want a nice clean surface.
Next, I spent a bunch of time with a Dremel, files, a drill, and a sander to cut and shape the panels before clear coating. The lettering on the switch panel was fun. I put on a strip of painter’s tape and then etched the letters into it. Using a laser cutter, I removed a thin layer of epoxy. I added a quick spray of green paint to match the car, and epoxy over the top. It really pops!

And, finally, here is the dash with all the bits and pieces put together and then installed in the car.
Overall this was an ambitious project for my first time skinning and first time working with carbon fiber. It came out pretty well but was a lot of work. A few things that I learned along the way:
- The temperature really matters. I ended up buying a large heater for the garage to get it up to 68°F/20°C and keep the cure times the same and predictable.
- Budget for more fabric and epoxy, especially as a newbie. I used a full quart of resin and corresponding hardener to apply and wet out the carbon fiber.
- WEST SYSTEM 300 Mini Pumps are super convenient for dispensing the 105 Resin and 207 Hardener. Measuring or weighing would be messy and time-consuming.
- Really pay attention when laying the fabric down. Do whatever you must to get it to lay flat.
- Compound curves are a challenge. Play with the fabric on the curves before pouring the epoxy to be sure it will contour appropriately.
- Wet sanding is satisfying but not if you have any holes or cracks. The epoxy sanding dust gets in there and dries like rock.
- 105 Resin/207 Special Clear Hardener is not able to tolerate long term UV exposure. I was looking forward to polishing it to a gloss but in the end, spray-on clear coating provided UV protection and required less work to achieve a flawless, high-gloss finish.


