by Brian Knight—GBI Technical Advisor
My son was sailing his older model Hobie 16 when the aft trampoline post suddenly gave way. The support structure holding the post in place failed, allowing the deck to deflect downwards and also punching a hole in the hull. Paul used WEST SYSTEM Epoxy and the following techniques to repair the damage.
Paul’s repair method involves removing a few feet of deck from the hull instead of the more traditional method of working through access holes. His method requires more cosmetic work to complete the repair, but access to the damaged area is much better.
To complete a similar repair, begin by removing the damaged hull. Do this by removing the bolts that connect the cross arms to the vertical supports. Also remove the rudder or at least disconnect it from its linkage. Support the hull on a couple of saw horses so it is at a comfortable working height. Secure it firmly so it is not wobbling around when you work on it.
The next step is to remove the damaged post. Make a transverse cut completely across the deck about one foot in front of the post and another about one foot aft of the post. Use a carbide router bit, a saber saw with metal cutting blade or the edge of a thin, rigid grinding wheel and cut all the way through the deck. Hobie attached the deck to the hull with a fillet of thickened polyester located under the deck flange. Grind through the fillet with a thin grinding wheel. Do not grind all the way through the flange. When everything is properly cut, you should be able to lift off a section of deck with the post attached to it.
There is a piece of expanded foam attached to the bottom of the post. Do not discard it. The foam keeps the lower end of the post properly located in the hull, so its orientation on the post is important. Remove any loose fiberglass from the foam and sand any fiberglass that remains firmly attached to it.
Repairing the damaged hull
Once you remove the deck, you have good access to the damaged area. Remove any cracked fiberglass from the damaged area on the hull. This is also a good time to remove any damaged fiberglass cloth that supported the post. Remove the loose and/or cracked fiberglass and clean the general area inside the hull with 850 Solvent, 855 Tool Cleaning Solution or other suitable solvent.
Patch the punctured hull following the standard procedure for repairing cored hulls as described in the Fiberglass Boat Repair and Maintenance Manual<D>. After repairing the hull, you can start working on the damaged post support.
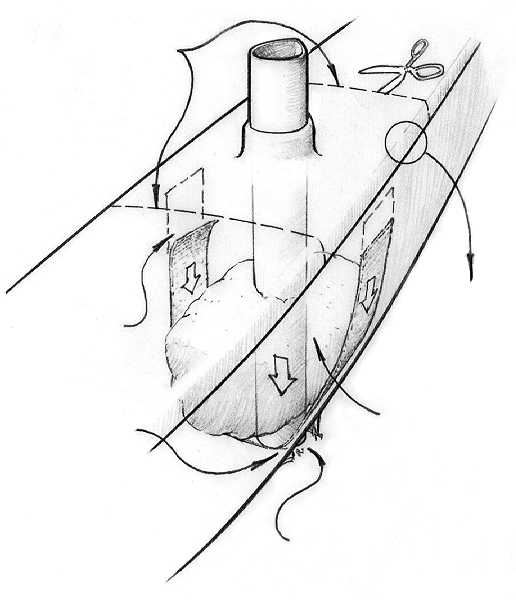
Originally, a fiberglass “sling” supported the post. The glass attached to the hull sides and passed under the foam block. The original support sling is made of fairly heavy fiberglass cloth tape about 4 inches wide. Since you have good access, consider using a wider piece of cloth. Wider cloth–say 8 to 10 inches wide–increases the bearing area on the hull so the repair will be unlikely to fail. With a course grinding wheel (around 32-grit), grind the area on the inside of the hull where the new sling will be installed. Grind until you have fresh laminate exposed in the entire repair area.
When all the necessary cleaning and grinding is complete, cut a strip of 12-ounce cloth to the appropriate width. The cloth should be just a little shorter than the distance from one gunwale down the side of the hull and back up the other side. Before replacing the post, foam and deck, push the post back up through the deck to its original position. There should be a noticeable line on the post where it weathered more above the deck flange. If you’re not sure, measure the height of the post on the opposite hull. Mark the post at the flange to be sure it stays in position when the deck is reinstalled.
Wet out the sanded area of the hull, the fiberglass cloth, and the surface of the foam that will be in contact with the fiberglass cloth with epoxy. Thicken some epoxy with 404 High Density Filler and spread it on the previously wet-out hull surface. Squeegee the wet-out cloth on the inside of the hull, intentionally allowing it to “bridge” across the hulls near the keel line. Carefully push the foam/post/deck assembly into the hull. The pressure from the foam block should slide the glass slightly down the hull, stretching it tight. You can tell when the entire assembly is in the right place when the deck section lines up with the deck on the hull. Do not push the assembly too far down. If you do, the cloth sling will have some slack when the deck section is pulled back into place. Be very careful when doing this operation.
Let the epoxy in the sling cure overnight before completing the repair. Once the epoxy has cured hard, grind a bevel on the top deck skin all the way down through the foam core to the bottom skin. Fill the entire bevel with strips of glass tape, each one just a little narrower than the previous one. When the glass strips cure, use a little 407 Low Density filler to fair the bevel flush. Using a putty made of epoxy and 406 Colloidal Silica filler, apply a new fillet under the flange that matches the original .
The nonskid texture is difficult to match, so grind identical smooth strips on the other hull so the hulls look symmetrical. Paint the repair to match the rest of the deck.


